Theme Installation
Install Directory using the WordPress back-end
Download the zip file from the member area For Easy installation and Traditional installtion of Directory theme as describe below.
Easy installation
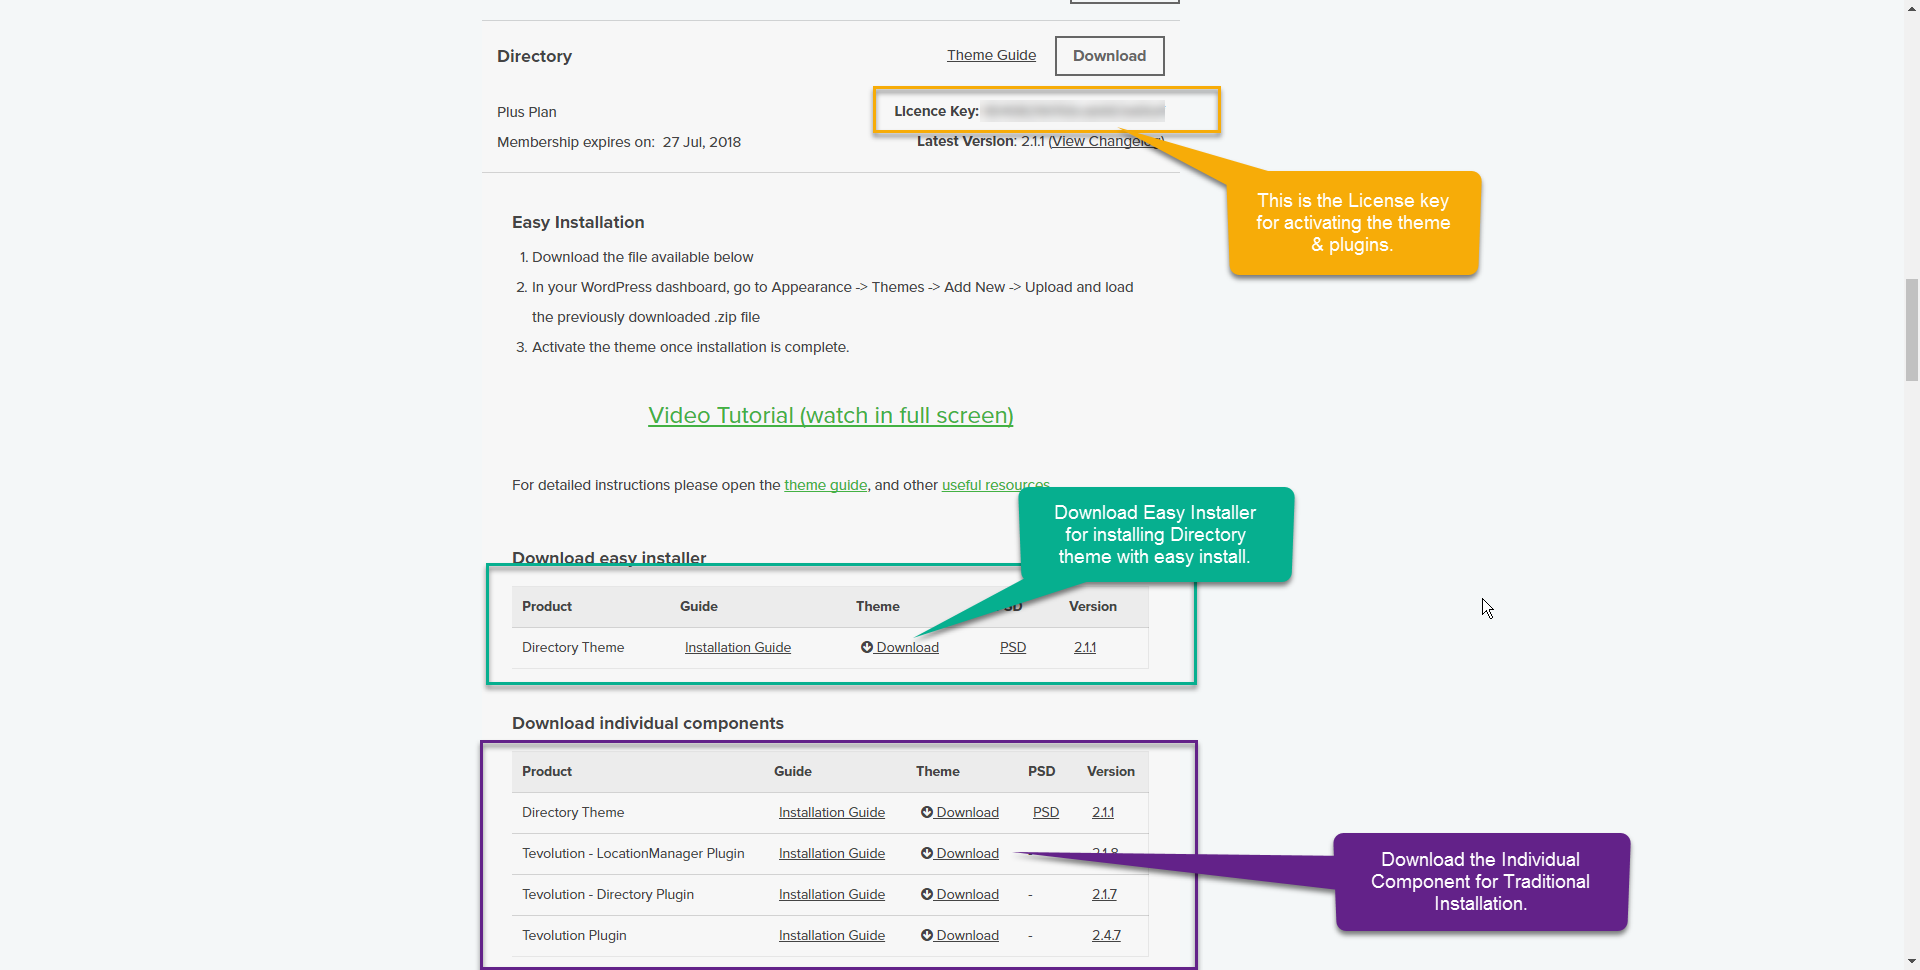
- Connect to the member area and expand the “Directory” area within the “Directory Downloads” section. Download the Easy Installation .zip file.
- Login to your WordPress dashboard and navigate to Appearance ⇨ Themes ⇨ Add New ⇨ Upload. Load the .zip file you just downloaded.
- Activate the theme once the installation process is done.
- Enter the license key. You can get it from the member area, under “My Downloads” inside Download pop up. Screenshot.
- Go to the Appearance ⇨ Themes section, click on the blue “Install sample data” button to populate your site with dummy data and make it look like our demo. The dummy data activation process can last up to 1-2 minutes. Don’t interrupt it.
Want to hire us to complete the install for you?
If you don’t have time to tinker with installing Directory purchase one of our installation packages and we’ll do it for you! If you already purchased one of the installation packages please claim it here.
Traditional installation
This installation type is necessary on servers that don’t allow plugins to be loaded automatically (which is the case with the Easy Installation method). Traditional installations basically means loading each Directory component separately. Instead of installing one file (like with Easy Installation) you’ll instead manually install 3 plugins and 1 theme.
- Download all files available under “Traditional Installation” inside member area.
- Login to your WordPress dashboard and navigate to Plugins ⇨ Add New ⇨ Upload.
- Load the tevolution.zip you just downloaded. Activate the plugin once the installation is done.
- Enter the license key. You can get it from the member area, under “My Downloads” inside Download pop up. Screenshot.
- Navigate to Plugins ⇨ Add New ⇨ Upload and load the Tevolution-Directory.zip. Activate the plugin once the installation is done.
- Navigate to Plugins ⇨ Add New ⇨ Upload for the last time and load the Tevolution-LocationManager.zip. Activate the plugin once the installation is done.
- Navigate to Appearance ⇨ Themes ⇨ Add New ⇨ Upload. Load the Directory theme file you previously downloaded. Activate the theme once the installation process is done.
- While in the Appearance ⇨ Themes section, click on the blue “Install sample data” button to populate your site with dummy data and make it look like our demo. The dummy data activation process can last up to 1-2 minutes. Don’t interrupt it.
Install Directory using FTP
Installing via FTP is necessary on servers that aren’t optimized for WordPress and can often interrupt the installation process because of the long execution time. Good news is that this type of install isn’t particularly hard, just longer compared to installing from the back-end.
- Download all files available under “Traditional Installation” inside member area and extract them using software like 7-Zip. Use the “Extract here” option; don’t extract into a new folder.
- Assuming you read the above linked FTP tutorial, navigate to /wp-content/plugins/ on your server and upload the three plugin folders (Tevolution, Tevolution-Directory and Tevolution-LocationManager)
- Navigate to /wp-content/themes/ and upload the 4th (theme) folder
- Login to your WordPress dashboard and go to Plugins. Activate Tevolution and enter the license key available inside our member area.
- Go to the Plugins section again and activate Tevolution – Directory and then Tevolution – Location Manager.
- Navigate to Appearance ⇨ Themes and activate the Directory theme.
- While in the Appearance ⇨ Themes section, click on the blue “Install sample data” button to populate your site with dummy data and make it look like our demo.
Possible installation issues/errors
Because of the vast array of different server setups, Directory installation sometimes doesn’t always go as smooth as we’d like. Here are the most frequent issues we’ve observed so far as well as instructions on how to solve them.
Blank page after activating the theme
Assuming you installed and activated the three mandatory plugins, a blank page after activating Directory usually means not enough server memory has been assigned to WordPress. This needs to be fixed in two stages; first we regain access to the back-end and then we make sure it doesn’t happen again.
Restoring wp-admin access
This is a common WordPress problem caused by plugin-plugin or plugin-theme conflicts. To restore the back-end we just need to deactivate the theme or plugin that caused the crash. Here are the steps:
- Connect to your server with FTP.
- Depending on what caused the crash (plugin or theme) navigate to either /wp-content/plugins or /wp-content/themes. In this particular issue, the theme caused the problem so go to /wp-content/themes.
- Rename the theme folder (in this case Directory) to anything else. For example: Directory-temp
- Navigate to your WordPress dashboard (it should open now) and go to Appearance ⇨ Themes. Load a stock WordPress theme (e.g. Twenty Fourteen) if it wasn’t loaded automatically.
- Go back to your server and rename the theme back to its original name.
- Navigate to Appearance ⇨ Themes again and re-activate your primary theme. In our case, Directory.
Follow these steps to fix the memory problem that caused the blank page
- Connect to your server with FTP
- Open wp-config.php located inside your root WordPress folder
- Add the following line of code at the very bottom of the file:
define( 'WP_MEMORY_LIMIT', '64M' );
500 Internal Server Error after loading sample data
From my experience this error is usually caused when the hosting provider sets the max script execution time too low. Since loading sample data can take up to a minute, the execution time needs to be long enough to complete the process. For this particular issue, we recommend contacting your hosting provider for assistance. Here are some of the things you can request/mention:
- Request them to increase the max_execution_time variable inside the php.ini file
- Ask them to tweak the max_input_time Apache setting (controls execution time for everything, not just PHP)
In case they can’t or don’t want to help, here’s something you can try using the .htaccess file: http://stackoverflow.com/a/8744184
Upgrading from Directory 1 to Directory 2
Stuff you need to know before upgrading
- Upgrading will undo your customizations. This is because all files are updated during the upgrade process. If you customized your site using plugins, there’s a chance some tweaks will still work.
- “T – Advertisement” and “T – About Us” widgets have been removed from Directory. If you’re using them on your current site just copy/paste their content inside a text file. Once the new theme is installed simply paste your contents inside the default WordPress “Text” widget.
- “All in One Search” widget has been renamed/replaced with “Instant Search” widget. The new widget comes with only 1 input field and displays instant results as soon as visitors start typing. Similar to the previous widget, you can add your custom fields inside the widget.
- Because of major CSS changes inside Directory 2 there’s a good chance most of your CSS tweaks (entered inside the Custom CSS Editor) won’t work. You will have to redo those.
- Color changes made inside Appearance ⇨ Customize ⇨ will be undone after upgrading to Directory 2.
- Support for the “Are you a human” and “WP-reCAPTCHA” plugins has been removed. Directory now uses WP-reCAPTCHA API for protecting forms against spam. The feature is built-in to no additional plugins are necessary. Click here to read more setting up captcha inside Directory 2.
- Certain features that were included inside Tevolution in earlier versions are now optional (free) plugins. Most notable of these is the Bulk Import/Export feature. For more info on how to get these features in Directory 2 please click here.
- You might experience issues with corrupted widgets if you’re running PHP version 5.2 and older. Backup your text-based widgets inside text files and re-create them after the upgrade. Click here for more info on how you can see your PHP version.
Along with backing up your site which you should get in a habit of doing regularly, one thing I highly recommend doing is creating a development server onto which you’ll load your current (production) site and then upgrade it to Directory 2. This will allow you to see exactly how will your site respond to the upgrade without affecting your existing content (and visitors). There are lots of ways to create a development server, here’s an article that lists 8 most popular ways.For specific instructions on moving your existing site to a dev/staging site open this WPbeginner article.
For moving from the development site back to production you can open this StackExchange discussion (it has several good methods).
Upgrading through the Dashboard
Go to wp-admin ⇨ Themes and see if you have any theme update notifications. Are you being prompted to update Directory to version 2.0 (or higher)? If yes, that means that Directory 2 is available and ready to be installed on your site. Along with updating the four main Directory components, upgrade to Directory 2 will require you to update everything else as well. Any Directory add-on or child theme you have installed must be updated to the latest version.
It’s important you perform the updates/steps in the following order
- Make sure you have a working backup of your site. Here are some plugins you can use.
- Install and activate a maintenance plugin while performing these updates. I personally like this one.
- Navigate to wp-admin ⇨ Plugins and update all your add-ons (if you have any). It’s important you update the add-ons before updating Tevolution.
- Update Tevolution.
- Update Tevolution-Directory and Tevolution-Location Manager.
- Navigate to wp-admin ⇨ Themes and update the parent Directory theme.
- Update your child theme (if you’re using one).
Traditional upgrade
Traditional upgrading means you’ll be overwriting files directly on your server (through FTP or cPanel). Instructions below will be written with FTP in mind. If you haven’t used FTP in the past please open our FTP tutorial.
- Make sure you have a working backup of your site. Here are some plugins you can use.
- Install and activate a maintenance plugin while performing these updates. I personally like this one.
- Download the zip files for all 4 Directory components (3 plugins, 1 theme) from the member area.
- Extract the zip files using software like 7-Zip. Use the “Extract Here” option.
- Connect to the server and navigate to /wp-content/plugins.
- Rename the current Tevolution folder by adding -old at the end. For example: Tevolution ⇨ Tevolution-old.
- Upload the updated Tevolution folder from your hard drive to /wp-content/plugins.
- Repeat the process for the other two plugins (Tevolution-Directory and Tevolution-LocationManager) and also for any add-on you have installed. You must update all add-ons to their latest version in order for them to work with Directory 2.
- Navigate to /wp-content/themes and rename the current Directory folder to Directory-old.
- Upload the new Directory folder from your hard drive to /wp-content/themes.
- If you’re using a child theme (like SpotFinder or CityGuide), you can update it the same way as you just did with the parent Directory theme.
- Delete all the -old folders if you don’t need them.
Possible issues after upgrading
Once the upgrade is complete you mind notice some weird graphical glitches with your theme. These are most common…
Design broken on listing detail pages
This can happen on other ages as well (category page, author page, etc) but is usually most noticeable on the listing detail page. From my experience this was usually caching related. Hard refreshing (CTRL + F5) or manually clearing the browser cache should solve this problem.
Color options inside Appearance ⇨ Customize not responding to changes
If this is happening to you please follow these steps.
- Connect to your server with FTP and navigate to /wp-content/themes/Directory/css.
- Open the admin_style.css file.
- Delete all contents of this file. CTRL + A and then Backspace should do the trick.
- Go back to Appearance ⇨ Customize. The color settings should work now.
Basic setup and tweaks
Setup permalinks
Setting up permalinks at the very beginning (just after installation) is important because Directory provides a lot of tools for customizing them. If you customize permalinks after Google indexes your site a bunch of visitors will land on 404 pages.
Directory is optimized to work with “Post name” permalinks. To active them follow these steps:
- Navigate to wp-admin ⇨ Settings ⇨ Permalinks.
- Under “Common Settings” choose the Post name option.
- Hit “Save Changes” to confirm the change.
With Post name permalinks active, you can tweak permalinks further by navigating to Tevolution ⇨ Settings ⇨ Permalinks (tab). Inside this section you either remove or edit slugs for: Categories, Tags, Individual listings, Authors, Cities and even your custom post types.
For example, Listing category pages in Directory contain the “listingcategory” slug. To remove that just disable the “Listing Categories Base” option inside the Permalinks section.
Old URL: example.com/listingcategory/places
New URL: example.com/places
Change the logo
To change the logo go to Appearance ⇨ Customize ⇨ Site Logo ⇨ Upload image for logo. Default logo size is 279×42 pixels. You can use that same section to change the favicon as well.
If your uploaded logo is larger than the default one you’ll most likely have to tweak the CSS for that area. Insert this code to Appearance ⇨ Custom CSS Editor.
#branding {
padding-top: 45px;
padding-bottom: 36px;
}
Tweak the space above and below the logo by lowering or increasing those padding values.
Setup the navigation menus
Directory comes with three custom menu locations:
- Primary – displayed above the logo
- Secondary – displayed below the logo
- Footer – displayed at the very bottom of the site (next to the footer credits)
To create a menu go to Appearance ⇨ Menus. When done, just assign it to one of the three areas mentioned earlier. For detailed instructions on how to do this, watch the following video
Enabling the sticky header
How to enable a sticky header?
To enable sticky header, Navigate to Dashboard >> Appearance >> General settings
From here you can enable or disable the sticky header by turning on or off the toggle button
Enabling sticky header on primary menu
It is possible to enable sticky menu in Directory theme by adding just a line of CSS code.
Please go to wp-admin >> Appearance >> Custom CSS Editor >> and here you can place the CSS code given below.
CSS Code:
.primary_menu_wrapper {background: #0165BD; position: fixed; z-index: 999999;width: 100%;}
After placing this code, please update the file. Clear your cache and browsing history and take a look at your site. Your primary menu should not be working as a sticky menu.
If the website has no sticky header, he will have to scroll up to till the header is reached and the menu is visible. This becomes inconvenient and time consuming. But with sticky header enables, he won’t have to bother this much. He will just have to reach the top of the screen to click the desired menu item in the sticky header.
How to create a mega menu?
Mega Menus are navigation menus with multiple columns under a single menu item. An example of such a menu can be seen by visiting the Directory demo site and hovering over the “Theme Features” menu item.
For details on creating a mega menu visit the mega menu tutorial.
Enable registration and setup register/login forms
To enable registrations inside WordPress navigate to Settings ⇨ General and choose “Anyone can register” under the “Membership” option.
Installing the theme created two important pages: Login and Register. You will find these pages in Pages ⇨ All Pages. From there you can change the page name and even the content. Do not remove the shortcode from each page as that’s what’s generating the login/register forms within the pages.
Change theme colors
Using the WordPress Customizer you can change the colors in real-time. To do that head over to Appearance ⇨ Customize ⇨ Color Settings. Edit an option and wait a few moments to see how it affects your site.
From the Customizer you can also change the background, just expand the “Background Settings” section. Once the background image is uploaded you’ll be able to tweak it’s position, repeat property and attachment.
Remove footer credits
The credits can be removed from Appearance ⇨ Customize ⇨ Footer. Instead of the code there by default, enter this instead
© 2014 Your Website Name
Change the currency
If you’re not in the United States or a territory that uses USD as their currency, head over to Tevolution ⇨ Monetization ⇨ Currency (tab) to change it. Instead of $ enter your currency symbol and instead of USD enter the three-letter currency code.
For more details about Currency settings click here.
Setup cities
Directory comes with the ability to add multiple cities within the theme. Once added, these cities become content filters. In other words, if a listing is added to one city (e.g. New York), it won’t display in other cities (e.g. London). It’s worth noting that these filters affect everything, not just the homepage map. If you try searching for a New York listing within London, you simply won’t be able to find it. To create and manage cities go to Tevolution ⇨ Manage Locations.
Here are some things you need to know about the multi-city functionality
- Despite the fact location management is divided into three levels (countries, states and cities), only cities are interactive. In other words, you can’t “visit” a specific country or state, just cities within those countries and states.
- Cities are essentially listing filters. Simply put, listings from one city won’t show in the other one.
- Multi-city functionality increases page load times because all content must be constantly filtered by cities as well as other parameters.
- All multi-city features are powered by the Tevolution – Location Manager plugin. This plugin is optional. Don’t use the plugin if you don’t really need it. For example, if the area you’re covering with your directory is really small, there is no real need to filter content by cities since content from one city might be interesting to residents of a nearby city.
- Always be aware of the city you’re “in”. If the listing you just added isn’t displaying on the homepage (or category page), check your current city. It’s possible you added the listing inside a city different than the one you’re currently “visiting”.
Add a city
To add your own city navigate to Tevolution ⇨ Manage Locations ⇨ Cities (tab) ⇨ Add new city.
Country & State
Choose the country and state appropriate for the city you’re adding. In case the country or state isn’t available, you can add a new one from the Country and/or State tab.
Map Type
Set the type of your map. If you want to add some flair to your maps consider getting the Map Customizer add-on.
Map Scaling Factor
Choose how much of the map to show. 1 displays the whole globe while 19 shows a specific house. An appropriate level for a city is around 13.
City Name
This is the most important field inside the whole form. By entering a value you are setting both the name of the city and its location. As soon as you stop typing your city name the little map will zoom on it. Feel free to move the pin in order to better define the location of your city.
City latitude and longitude
These two fields are populated automatically as soon as you enter a value inside the “City Name” field. They will also be automatically updated if you move the pin around (inside the small map).
Homepage / Category page map display
These settings let you control the behavior of the map. If you want to show all available listings at all times be sure to select the “Fit all available listings” option. If you want to respect the zoom level set under “Map Scaling Factor”, choose that option.
Post Type & Categories
Choose the post types and categories that you plan on showcasing in this city. Selected post types and categories will appear inside the homepage map.
City Message
Write a city description that you can display when visitors are browsing that particular city. To actually show the description enter the following shortcode inside a regular “Text” widget.
[city_message]
Background Color and Background Image
Choose a color by clicking on the input field and using the color picker. Set a background image by clicking on Browse, uploading an image and then clicking on “Set as background image” in the bottom right corner. Ideal image size is 1920 pixels. The area affected by both the color and image is the area on the left and right side of the container. Example.
Header Background Color and Image
Choose a color by clicking on the input field and using the color picker. Set a header background image by clicking on Browse, uploading an image and then clicking on “Set as header image” in the bottom right corner. Ideal image size is 1240 pixels. The area affected by both the color and image is the area usually populated with the logo and the search bar. Example.
Add countries & states
You can add new countries and states from the “Countries” and “States” tabs inside the Tevolution ⇨ Manage Locations section. Most world countries are already added so you don’t really have to add them manually. However, if you do commit to that, make sure to add countries first since you’re required to select a country while adding a state.
Location Settings
The majority of these settings are available from Tevolution ⇨ Manage Locations. Here’s a list of options available in that area…
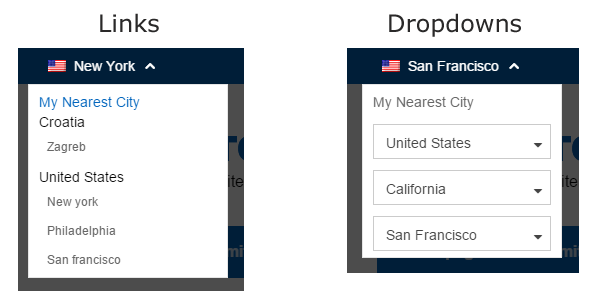
City selector style
This option defines the look of the city selector available inside your theme header (usually the top left corner). Here’s how they look in the front-end.
City selector levels
The option you choose here will affect both the city selector and the multi city field inside your submission forms. In other words, if you select the “Only Cities” option visitors won’t be required to input the country and state while submitting listings.
Is it possible to change the country ⇨ state ⇨ city hierarchy?
It’s not easy, but yes, it’s possible. For example, let’s imagine you want to change the hierarchy levels to city ⇨ neighborhood. Here’s how you do it:
- Inside the “City selector levels” option select “One Country”.
- Go to Manage Locations ⇨ States (tab) and add your city as a state. For example, create a new state called “Los Angeles”.
- Go to Manage Locations ⇨ Cities (tab) and add your neighborhood as a city. Instead of entering the city name as “Los Angeles”, instead enter “Beverly Hills”. Adjust the pin on the map if necessary.
- Open the en_US.po language file (click here for a tutorial).
- Translate all necessary instances of the word “state” into “city”.
- Translate all necessary instances of the word “city” into “neighborhood”.
If you did everything correctly you should now have a two-level hierarchy with cities and neighborhoods.
Location Tracking Method
Directory an IP tracker built-in that allows your theme to pinpoint the visitors location. The “Location Tracking Method” option allows you define the service that will be used for this. I recommend you change this only if you’re experiencing problems with the default (Freegeoip) option.
To enable the MaxMind option follow these steps
- Download this zip file.
- Extract the file using software like 7-Zip.
- Connect to your server with FTP. Click here for a tutorial if you haven’t done it before.
- Place the contents of the zip file inside the /wp-content/plugins/Tevolution-LocationManager/ folder on your server.
- Enable the “MaxMind” option inside Tevolution ⇨ Manage Locations.
Homepage Displays
Choose what happens when visitors come to your site.
Default city – displays your default city. You can set the default city from the Cities tab.
Ask to show nearest city – upon arrival visitors will see a strip at the top asking them to share their location.
Nearest city – visitors will be taken to the city nearest to them without the ability to stop the process.
Activate location management for
The multi-city functionality will only be active for post types selected here. If you want blog posts to show inside all cities don’t check the “Post” box.
Track city visits (city logs)
Enable this if you want to see how visits are distributed across your cities. City log information is available from Tevolution ⇨ Manage Locations ⇨ City Logs (tab).
Map Shortcode
Use the below shortcode to display content (one or most post types) within a specific city. To create a page using this shortcode navigate to Pages ⇨ Add New and paste in the code.
[TCITY-DIRECTORYMAP cityid='1' post_type='listing' height='500'][/TCITY-DIRECTORYMAP]
cityid – the ID of the city you want to show. The city ID is displayed when hovering over a city inside Manage Locations ⇨ Cities (tab). Screenshot.
post_type – enter the post type you want to show (e.g. listing, event, property, etc). To display multiple post types separate them with a comma. For example, to display listings and properties, enter the value like this: ‘listing,property’.
height – enter the map height in pixels.
Bulk upload cities
To use this functionality you’ll first need to install the optional (and free) Bulk Import/Export plugin. Here are the installation steps…
- Download the Bulk Import/Export extension.
- Navigate to Plugins ⇨ Add New ⇨ Upload and load the downloaded zip file. Activate the plugin once the installation is complete.
- To start using the plugin navigate to Tevolution ⇨ Bulk Import/Export.
- To bulk upload city focus on the CSV City Import section
How to bulk upload cities?
Start by downloading the sample CSV file available at the bottom of the CSV City Import section. The content you add must match the structure inside that file. To actually edit the CSV you’ll need a text editor like Notepad++, or even better, Microsoft Excel. For general tips on editing CSV files open the Bulk Upload section of this guide.
Single city functionality
If you plan on using Directory as a classic directory where all listings display at the same time (there are no cities) you should look to use Directory in what we call the “single-city” mode. Follow these steps to get started:
- Go to wp-admin ⇨ Plugins and deactivate the Tevolution – Location Manager plugin.
- Go to Appearance ⇨ Widgets and place the T → Homepage Map – single city inside the Homepage Banner area.
- Tweak the map location and settings by going to Tevolution ⇨ Settings ⇨ Map Settings (tab).
The biggest benefit of using a single city is the boost in performance. Without all those additional filters/queries your site will work noticeably faster. Another benefit are cleaner and shorter URLs. Without the Tevolution – Location Manager plugin, your URLs won’t have the /city/city_name slug within them.
Add a listing
Adding listings is probably something that both you and your visitors will be doing a lot. However, before you start adding listings make sure to complete these tasks:
- Create categories. Do that from wp-admin ⇨ Listings ⇨ Listing categories.
- Create your cities. That’s assuming you’re not using the single-city mode. Defining cities before adding content is important because you need to assign a city while creating the listing.
- Create/edit custom fields. If you plan on adding unique custom fields to your site, do that before adding the listings. Custom fields can be tweaked from Tevolution ⇨ Custom Fields
Add listings from the back-end
To add a listing go to wp-admin ⇨ Listings ⇨ Add Listing. Inside the “Add New Listing” screen that opens you should enter the title, description and populate the fields located below the main content area. You can control which fields show inside this area from Tevolution ⇨ Custom Fields. For more details on that section click here.
Below the custom fields you should see available price packages. To create and manage your price packages navigate to Tevolution ⇨ Monetization.
Added a listing, but it’s not showing on the site (the front-end)?
There can be several reasons for this but these are the most common
- The city you’re “visiting” in the front-end doesn’t match the city in which you submitted the listing. Use the city selector (top right corner) to change the city.
- By default the Homepage Display Posts widget is configured to only show featured listings. Configure the widget (from Appearance ⇨ Widgets) and make it display what you want.
Add listings from the front-end
Front-end submission is done using the “Submit Listing” form. A page containing this form should have been created when you activated the theme, you’ll find it from wp-admin ⇨ Pages. The URL of that page will be something like www.your-domain.com/submit-listing. In case you deleted this page (or it was never created), go to Pages ⇨ Add New and insert the following shortcode:
[submit_form post_type='listing']
Now that the page is created both you (the admin) and your visitors can use it to submit content. Similar to the back-end submit section, most of the input fields available inside the form can be modified from the Tevolution ⇨ Custom Fields section. You can also use that section to add new fields. To modify the “Select a package” section of the submission form, navigate to Tevolution ⇨ Monetization section. Click here for details on how to create price packages.
How to have Facebook, Google+, Twitter custom fields on Submit listing/post page?
Go to Tevolution ⇨ Custom Fields. Edit the custom field named Facebook/Twitter/etc… Enable the option “Submission form (field will show on editing screen regardless)” in to “Show the field in” option. Save the field. Do the same for rest of the fields. Clear cache.
How and where to moderate user submitted listings?
Once users submit listings they will show up inside the wp-admin ⇨ Listings section. From there you can draft, publish or edit them. Another place from where you can manage them is Tevolution ⇨ Transactions. Use that section to bulk confirm or bulk reject transactions/listings. For more information about Transactions click here.
To set the default status for submitted listings (publish/draft) navigate to Tevolution ⇨ Settings ⇨ Submission page settings ⇨ Default status for free/paid submissions
Manage pages
Homepage
The homepage in Directory is a regular WordPress page created with the Front Page Template. The page template is designed to load widgets entered in Appearance ⇨ Widgets. This page is usually created during theme installation. However, if it’s not, i.e., if your homepage is not showing widgets follow these steps to fix it:
- Go to Pages ⇨ Add New. Enter the page title as “Home” (for consistency sake, this isn’t really important) and on the right side, under Page Attributes ⇨ Template choose the “Front Page Template”. Publish the page.
- Navigate to Settings ⇨ Reading and under “Front page displays” choose “A static page”. In the “Front page” dropdown choose “Home”.
- Go to Appearance ⇨ Widgets to populate areas such as “Homepage Banner”, “Homepage Sidebar” and “Homepage – Main Content” with widgets.
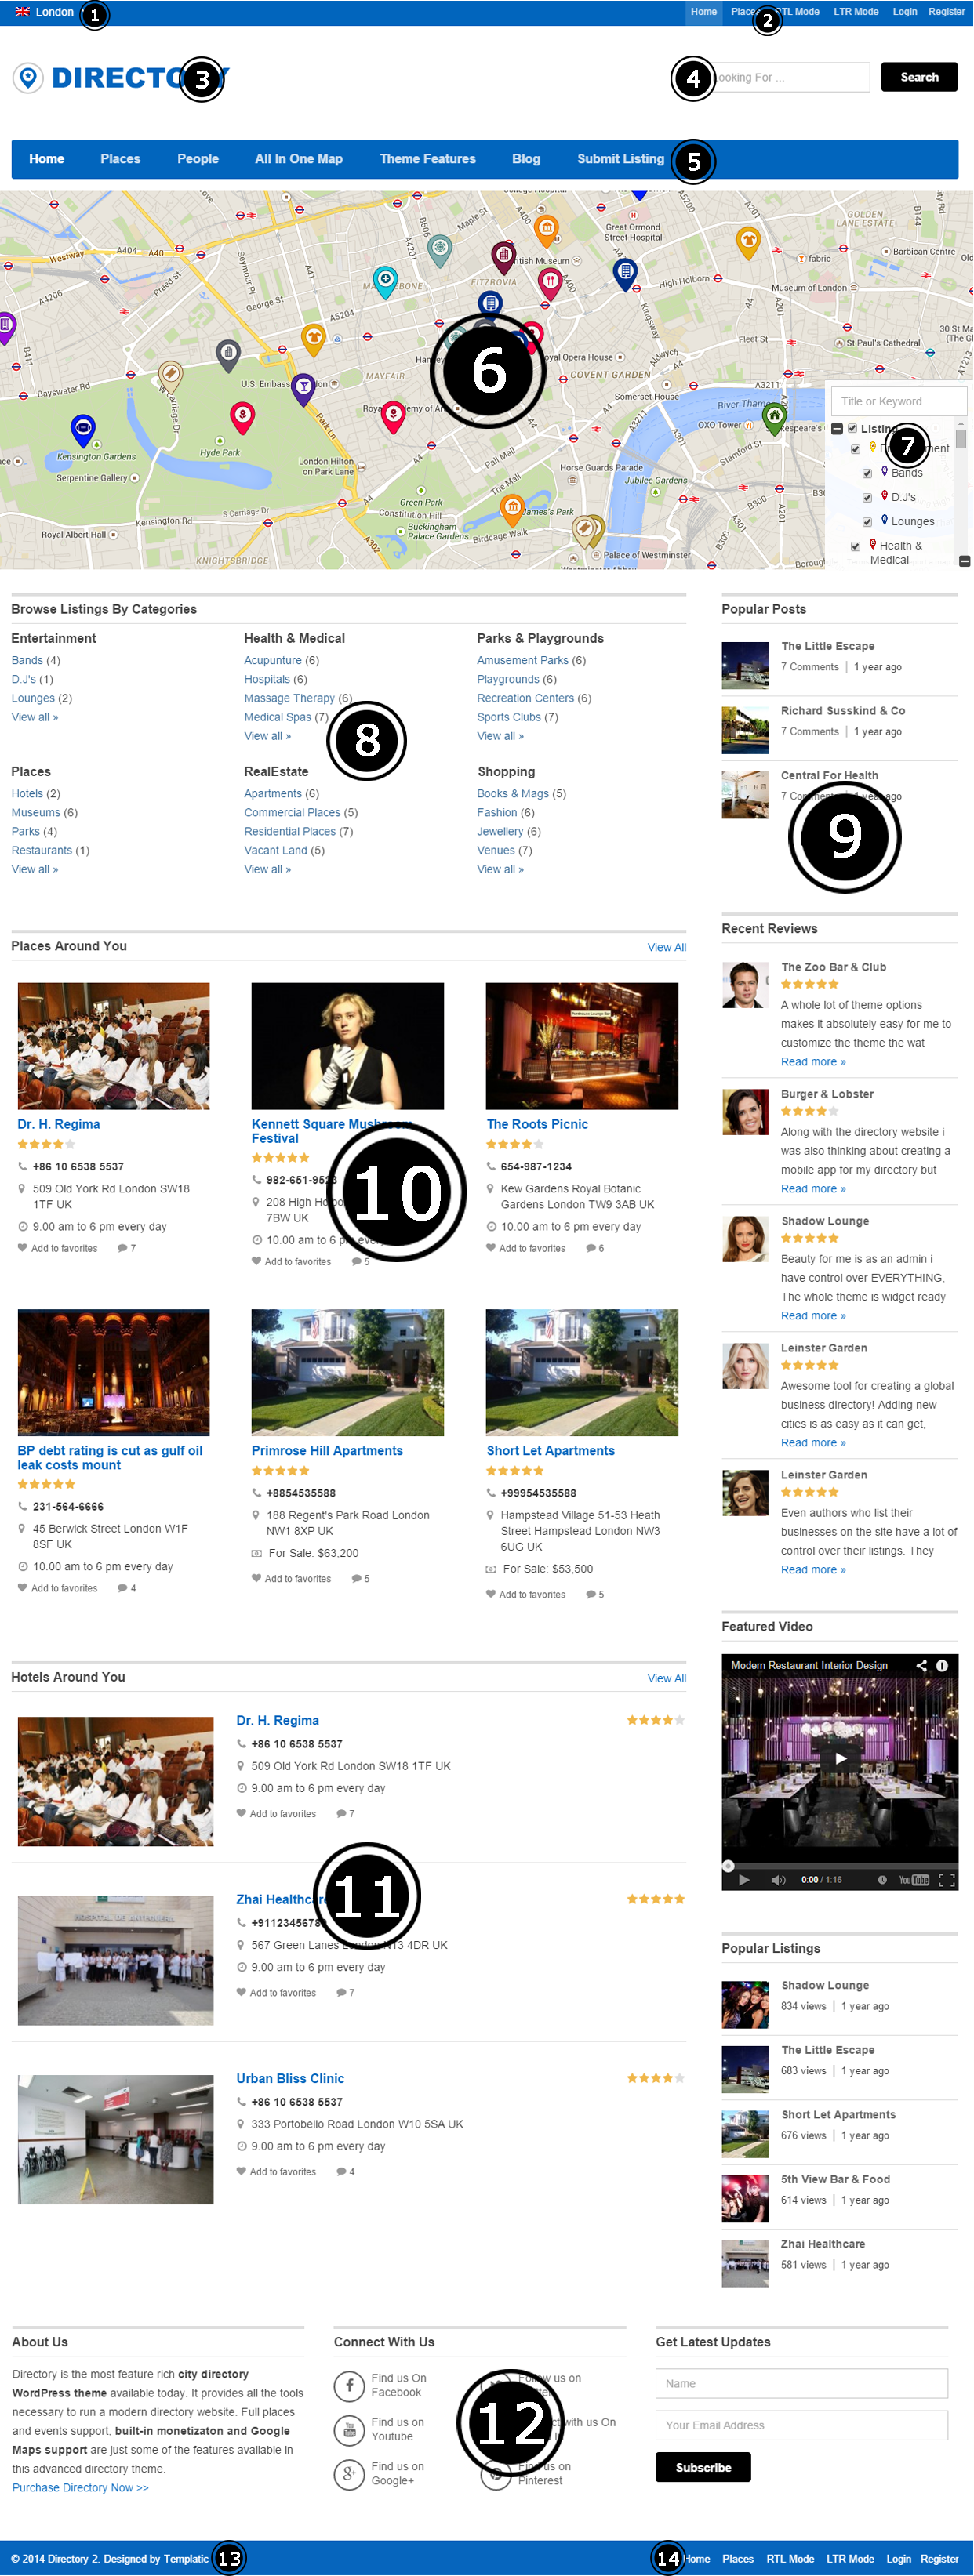
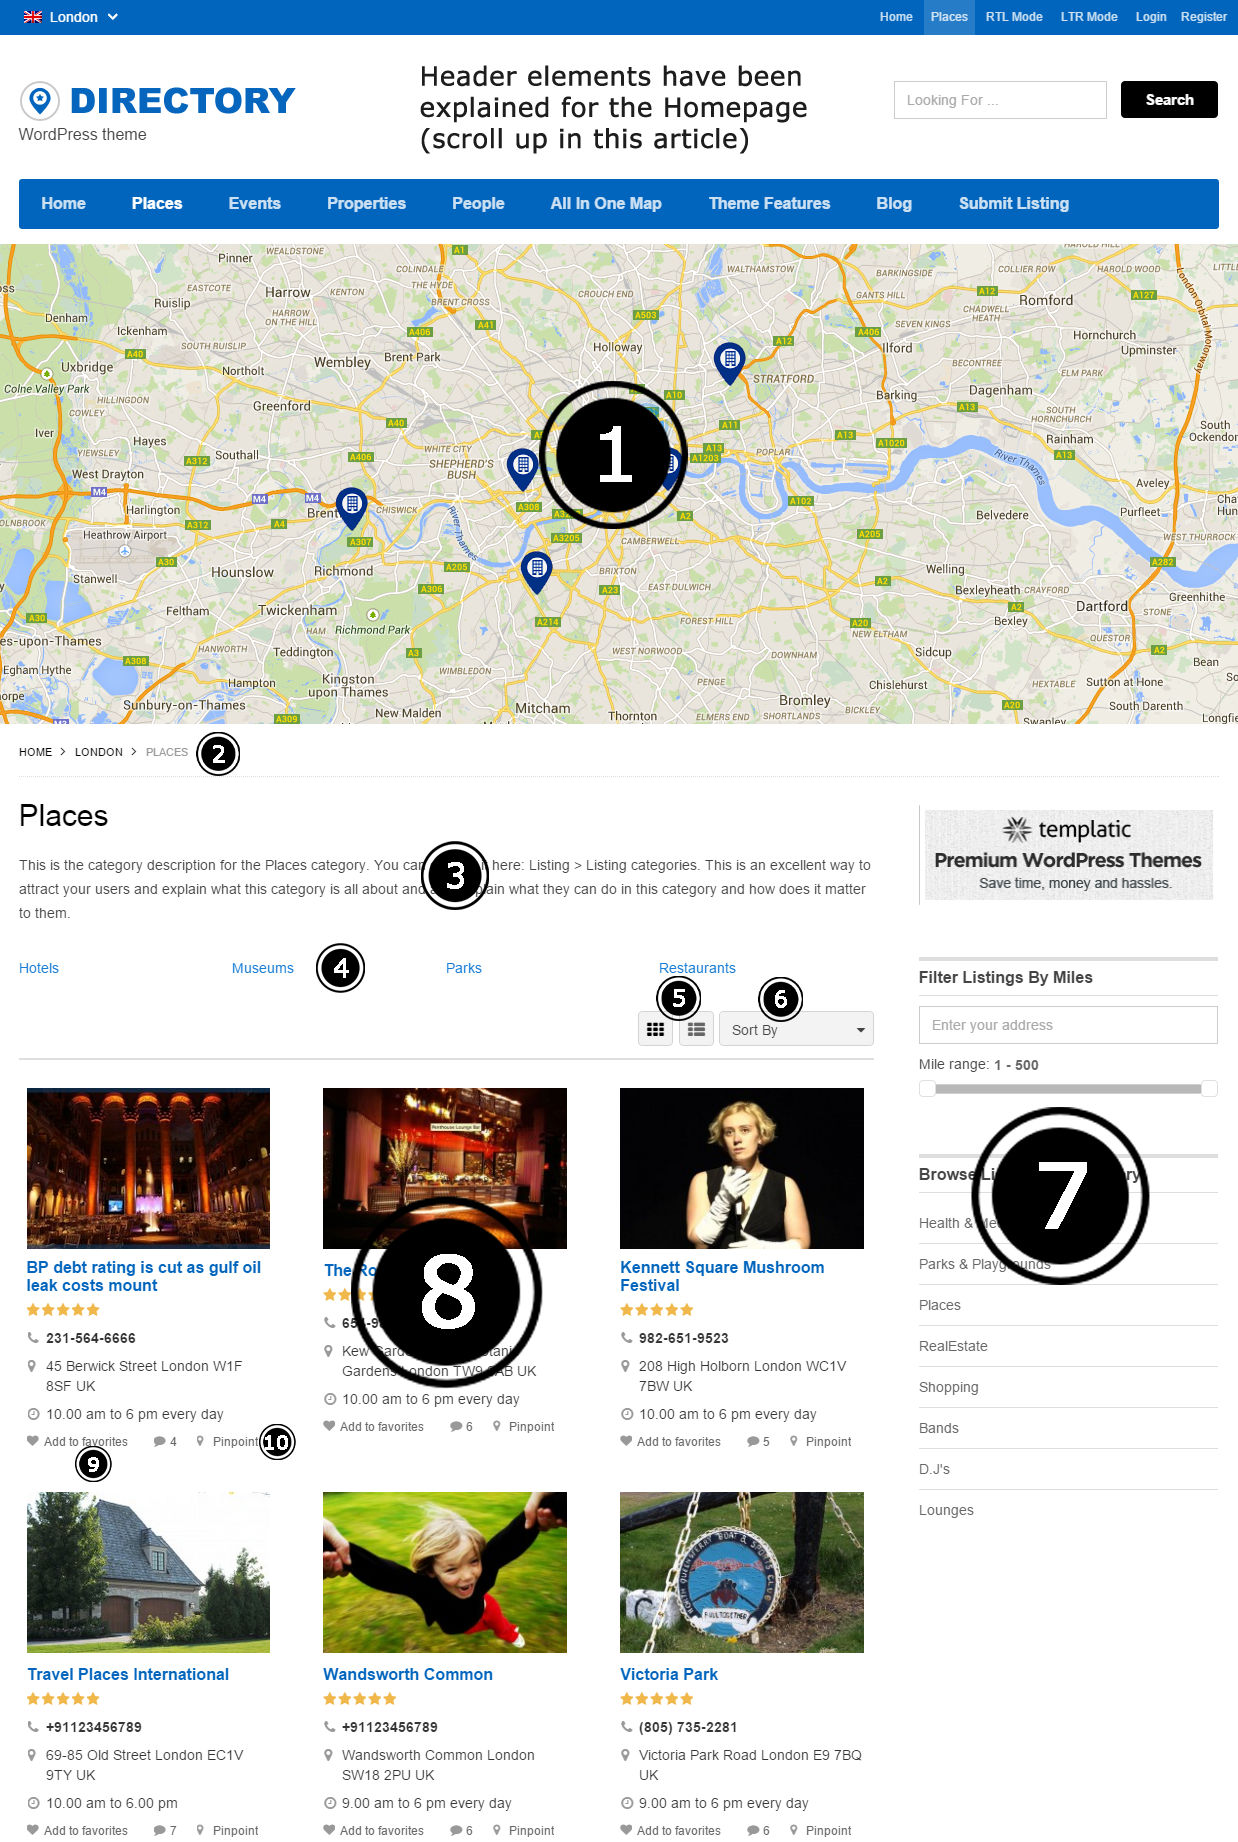
1 – City selector
This is the location from where visitors can change their active city. You can change settings for the city selector from Tevolution ⇨ Manage Locations. Control the appearance and behavior of the city selector by tweaking “City selector style” and “City selector levels” inside the Manage Locations area. Click here to read more about this section.
Quick note: If you cannot see that city selector at the top it likely means that you haven’t activated (or installed) the Location Manager plugin.
2 – Primary navigation menu area
By default this menu area doesn’t show inside the theme. To make it show head over to Appearance ⇨ Menus. Create a menu and assign it to the “Primary” location (under Menu Settings). For more details on how the menus actually work, check out this video.
Quick note: Login and Register buttons are added automatically to this menu. Also, the Register button will show only if the “Membership” option is turned on in Settings ⇨ General.
How to change the login and register popups into normal links?
To do that first install the Code Snippets plugin. Then add the following code inside a new snippet (click here to view the code)
How to remove the login, register and logout links?
Install the Code Snippets plugin and then add the following code inside a new snippet
add_filter('tmpl_logreg_links','tmpl_logreg_links_return');

function tmpl_logreg_links_return(){
 return array('');
}
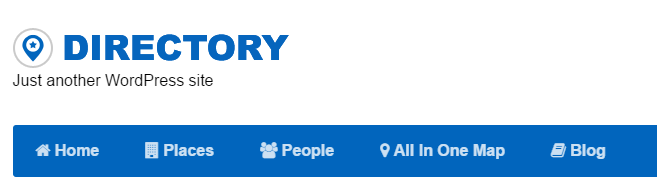
3 – Site logo
To change the logo go to Appearance ⇨ Customize ⇨ Site Logo ⇨ Upload image for logo. Default logo size is 279×42 pixels. You can use that same section to change the favicon as well.
If your uploaded logo is larger than the default one you’ll most likely have to tweak the CSS for that area. Insert this code to Appearance ⇨ Custom CSS Editor.
#branding {
padding-top: 45px;
padding-bottom: 36px;
}
Tweak the space above and below the logo by lowering or increasing those padding values.
4 – Header search
To re-create this area go to Appearance ⇨ Widgets and place the “T – Instant Search” widget to the “Header” area. The widget comes with a lot of settings, tweak them to your liking.
5 – Secondary navigation menu area
To setup the main menu navigate to Appearance ⇨ Menus. When done creating the menu assign it to the “Secondary” location. For detailed instructions on using menus watch this video
How to create a menu with multi-column items (mega menu)?
To create an extensive navigation menu visit our mega menu article. To get a better idea how this menu looks open the Directory 2 live demo and hover over the “Theme Features” menu item.
Want to style your navigation bar with icons?
If yes, just use Front Awesome icons. To apply an icon expand the menu item you want to edit and insert the icon code inside the “Navigation Label” field (next to your item name). For example:
<i class="fa fa-home"></i> Home
<i class="fa fa-spoon"></i> Restaurants
If you did everything correctly, your menu should look something like this
How to add login, register and logout buttons to the secondary menu?
Install the Code Snippets plugin and then add the following code inside a new snippet
add_filter('tmpl_logreg_links','tmpl_logreg_links_return');

function tmpl_logreg_links_return(){
 return array('primary','secondary');
}
6 – Homepage map
The homepage map can be enabled/displayed by going to Appearance ⇨ Widgets and placing the “Homepage map – multi city” or “Homepage map – single city” widget inside the “Homepage Banner” widget area. The theme will display only one of these widgets at the same time. The “multi city” variant will display when Location Manager plugin is enabled and “single city” variant will display when it’s inactive. For more details on single city functionality click here.
If you loaded the dummy data your homepage map should already be showing. In that case head over to Tevolution ⇨ Manage Locations to edit the map. The map you see on the homepage is directly connected to the city it’s supposed to show. In other words, to edit the map, edit the city. You can edit your city from the “Cities” tab inside the Manage Locations area. Screenshot.
When editing a city use the small map displayed under the “City Name” field to set the position of the map. You can alter the position after entering the address by dragging the pinpoint icon within the map. Control how much (or how little) of your city is shown by adjusting the “Map scaling factor”.
Why aren’t my listings showing up inside the homepage map?
Here are the most common reasons (and solutions) to this problem:
- You haven’t selected any categories to show for that city (fix it by editing the city inside Tevolution ⇨ Manage Locations ⇨ Cities).
- The listing you submitted (are looking for) doesn’t have a city assigned to it. Edit the listing and assign the city. I’m assuming here you’re not running Directory in single-city mode.
- You’re looking inside the wrong city, i.e. not the city you assigned the listing to. Change the active city from the city selector in the top left corner.
- You already have over 400 listings on the map. To reduce load times Directory will display only 400 listings on the map. To display all available listings open the \plugins\Tevolution-LocationManager\functions\google_map_widget.php file and locate this code around line 239.
'posts_per_page' ⇨ 400,
Replace it with
'posts_per_page' ⇨ -1,
- The wrong widget is entered inside the “Homepage Banner” area. The widget you should use is T – Homepage Map (either multi-city or single-city). Map widgets such as T – Category Page Map, T – Detail Page Map or T – Google Map Location should not be used for this purpose.
- If you’re using Directory in single-city mode make sure the coordinates are entered correctly inside Tevolution ⇨ Settings ⇨ Map Settings (tab).
- The address field contains an empty space at the end. This can happen when pasting address from another source. To resolve the problem edit the listings address and remove the extra space.
Want to display a slider instead of the map?
To achieve this just go to Appearance ⇨ Widgets and place the “T – Homepage Banner” widget into the “Homepage Banner” widget area. To display static images inside the slider check the “Use custom images” box inside the widget and enter image URLs. Images can be uploaded from Media ⇨ Add New. Don’t forget to copy the “File URL” value after uploading an image.
Note: If you don’t want your slider displaying across the full width of the site go to Tevolution ⇨ Settings ⇨ Map Settings and disable the “Show map in full width” option
7 – Map categories
Just like the actual map, map categories are also assigned while creating/editing the city. Head over to Tevolution ⇨ Manage Locations ⇨ Cities and edit a city (or create a new one). To make sure your categories are displayed make sure to make a selection inside the “Post Type” and “Categories” field.
8 – Category list
To setup this area navigate to Appearance ⇨ Widgets and place the “T – All Categories List” widget inside the “Homepage – Main Content” area.
9 – Homepage sidebar
Edit this section by going to Appearance ⇨ Widgets and placing widgets inside the “Homepage Sidebar” widget area. Widgets used in the image above are:
- T – Popular Posts (sort by comments)
- T – Recent Reviews
- Text (with an embedded YouTube video)
- T – Popular Posts (sort by views)
10 and 11 – Homepage main content area
This area is primarily used for displaying recent or featured listings. To setup the area go to Appearance ⇨ Widgets and place the “T – Homepage Display Posts” widget inside the “Homepage – Main Content” area. The widget comes with several options built-in, including the ability to change the overall appearance of the listings (list or grid).
12 – The footer
Edit this section by going to Appearance ⇨ Widgets and placing widgets inside the “Footer” widget area. Widgets used in the image above are:
- Text
- T – Social Media
- T – Newsletter
How to insert icons inside the Social Media widget?
Icons are are generated by Font Awesome. You should insert the icon (and text) inside the “Social Text” field. Example:
<i class="fa fa-facebook"></i> Find us on Facebook
13 – The credits
The credits can be removed from Appearance ⇨ Customize ⇨ Footer. Instead of the code there by default, enter this instead
© 2014 Your Website Name
14 – Footer menu
To setup this menu navigate to Appearance ⇨ Menus. When done creating the menu assign it to the “Footer” location.
Category page
Category pages (as the one screenshoted below) are generated automatically as soon as you create a category from Listings ⇨ Listing Categories. To tweak category page options navigate to Tevolution ⇨ Settings ⇨ Category page. For more details on how to edit each of the category page components check out this image…
1 – Category page map
To display the category page map in this way navigate to Appearance ⇨ Widgets and place the “T – Category Page Map” widget inside the “Listing Category Pages – Below Header” area. In case your map isn’t showing even after inserting the widget please go to Tevolution ⇨ Settings ⇨ Category Page. Disable the “Map view” option.
The category page map is very versatile, it can be displayed in three ways:
- As a big map below the header (as displayed inside the screenshot above)
- As a tab (next to List and Grid buttons) – to enable this just turn on the “Map view” option mentioned above.
- As a sidebar widget – to set this up go to Appearance ⇨ Widgets and place the “T – Category Page Map” widget inside the “Listing Category Page Sidebar” area.
2 – Breadcrumbs
Displays a path to your current category. Breadcrumbs can be disabled from Appearance ⇨ Theme Settings.
3 – Category description
This text can be entered while creating (or editing) a category from Listings ⇨ Listing Categories. Screenshot.
4 – Sub-categories
If the category being displayed contains any sub-categories, they will show here.
5 – View switchers
Using these buttons you can quickly change the layout of the page from grid to list. You can enable a third option (Map View) by going to Tevolution ⇨ Settings ⇨ Category Page ⇨ Map View. To set the default view for category pages go to Tevolution ⇨ Settings ⇨ Category Page ⇨ Default page view.
6 – Sorting options
Using this sorting options dropdown visitors can easily change the sorting method used to display listings. To select which options display here go to Tevolution ⇨ Settings ⇨ Category Page and check the boxes under “Sorting options”.
7 – Category page sidebar
You can edit this area of the theme by going to Appearance ⇨ Widgets and placing widgets inside the “Listing Category Page Sidebar”. Widgets displayed in the image above are…
- Text (with an image displayed using HTML)
- T – Search by Miles Range
- T – Browse by Categories/Tags
8 – The actual listings
This area displays the listings within your category.
How to set a featured image?
When adding a listing from the back-end use the “Featured Image” box located inside the right sidebar. You can also do it by simply uploading an image to the listing image gallery.
9 – Add to favorites button
Visitors can mark listings as favorites in order to locate them more easily in the future. Favorite listings are displayed inside author pages, under the “My Favorites” tab.
10 – Pinpoint button
Clicking on the pinpoint button will focus the category page map on that particular listing. You can tweak settings for this feature in Tevolution ⇨ Settings ⇨ Category Page.
Listing detail page
The listing detail page is what you get after opening an individual listing (created from Listing ⇨ Add Listing). For more information about elements on that page check out the image below.
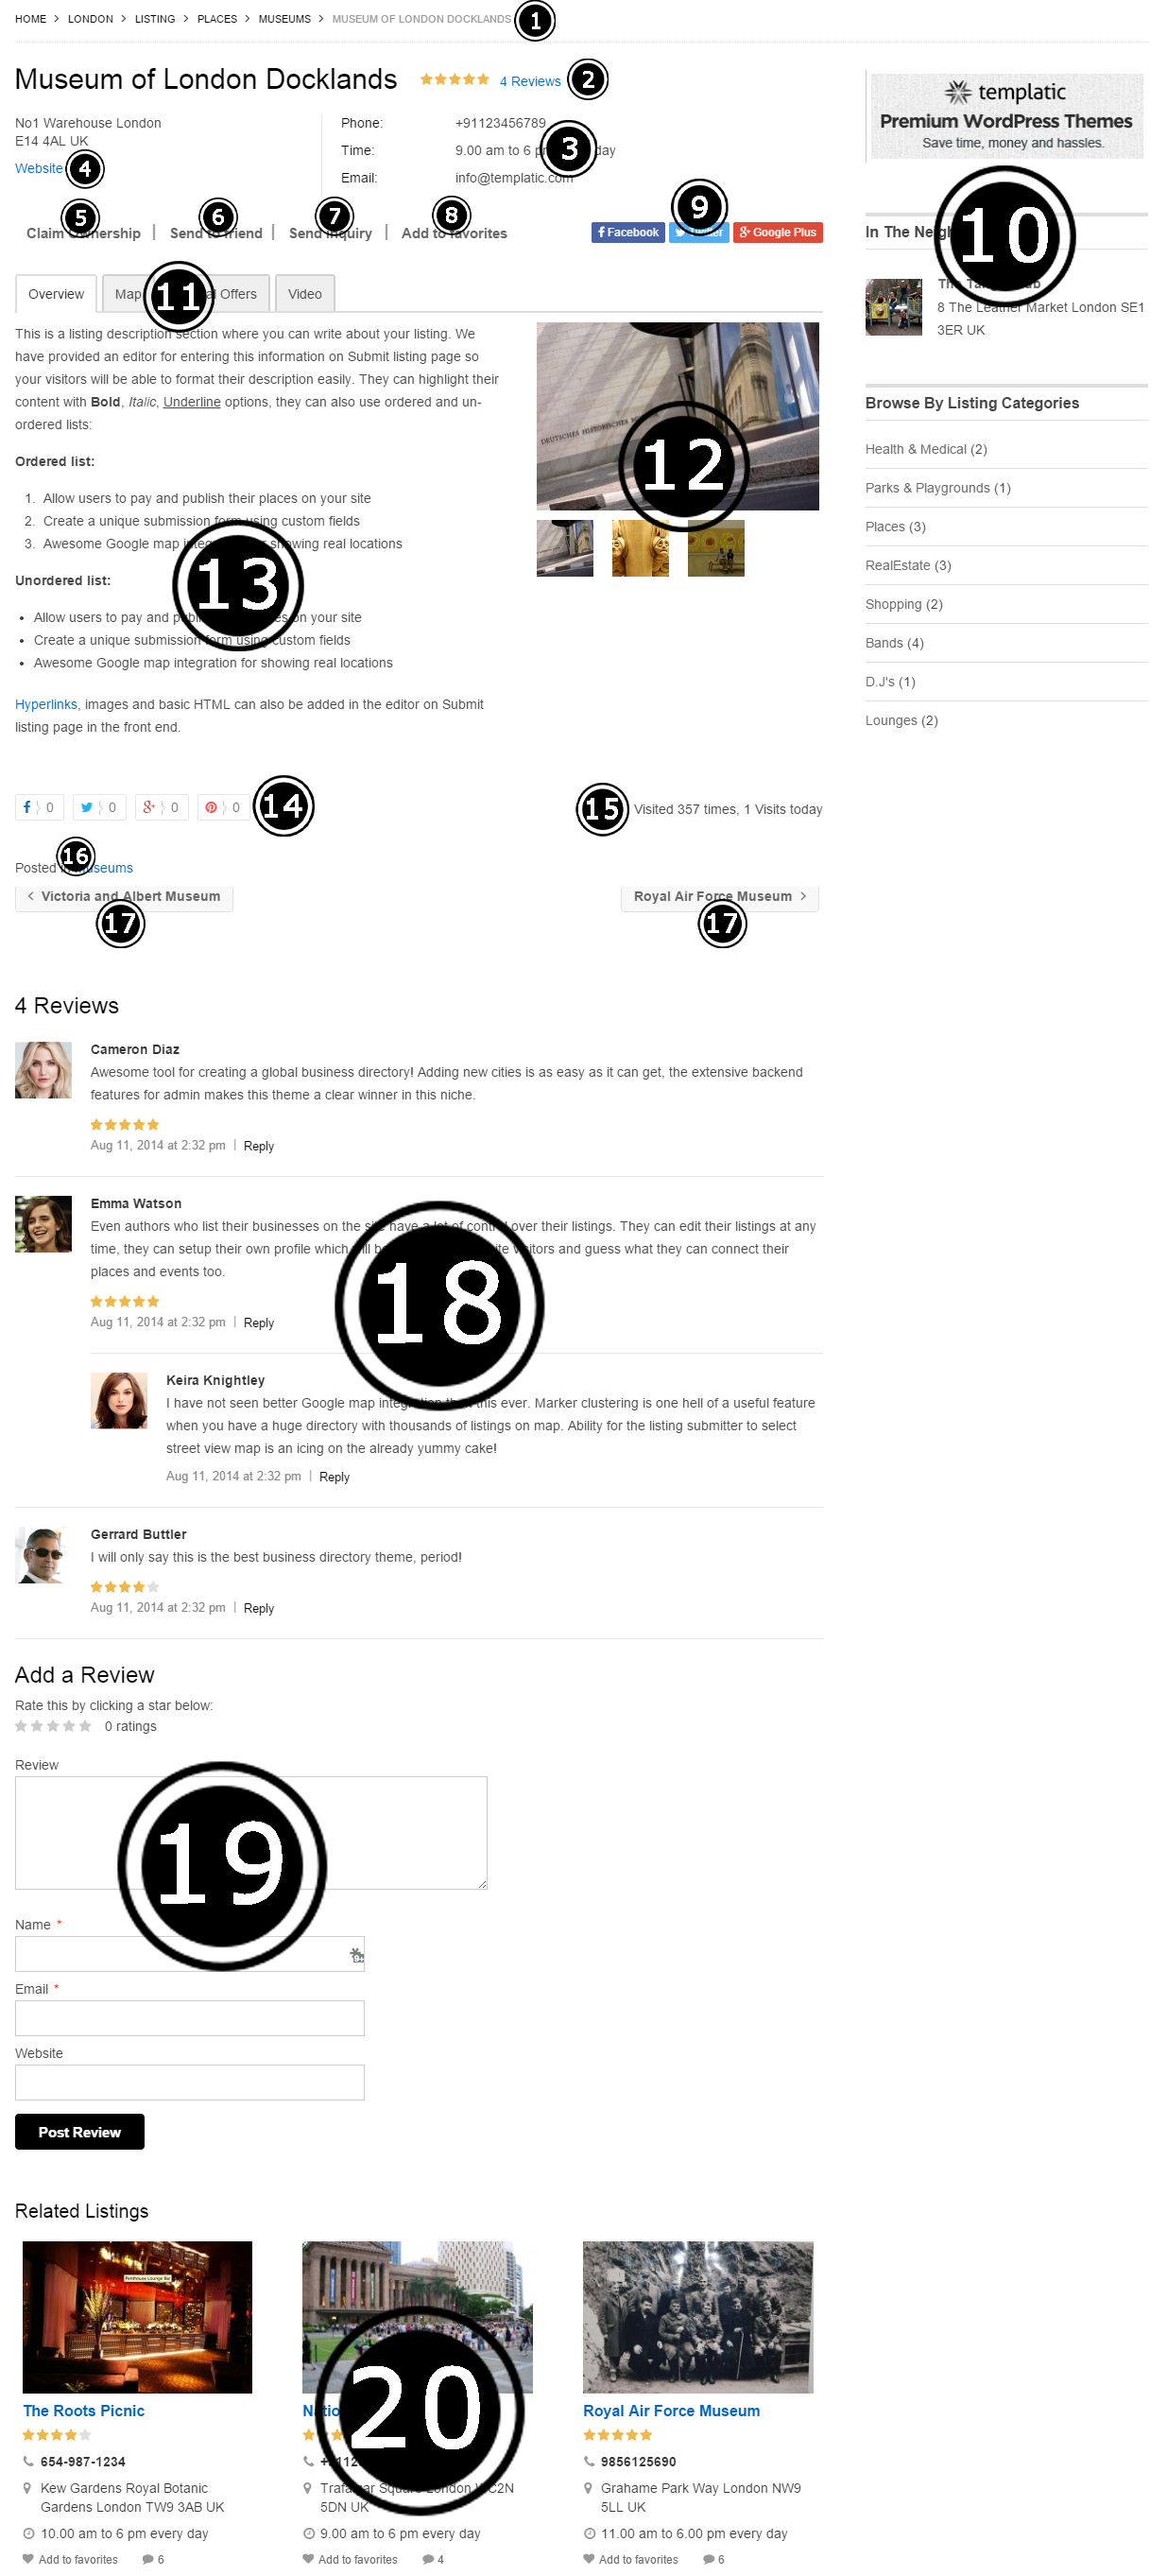
1 – Breadcrumbs
Displays a path to your listing. Breadcrumbs can be disabled from Appearance ⇨ Theme Settings.
2 – Comment/Review information
In this section visitors can see how many people reviewed the listing and also the overall start rating. If reviews are an important part of your website consider getting the Multi Rating add-on.
3 – Listing header fields
Each of these three fields can be controlled from Tevolution ⇨ Custom Fields. For example, to hide the “Email” field, click to edit the field (in the Custom Fields section) and then under “Show the field in” uncheck the “Detail page” option.
The code that displays this area is located in /wp-content/plugins/Tevolution-Directory/templates/single-listing.php around line 80. Edit the contents of this DIV
<div class="entry-header-custom-right"></div>
Please do not make changes directly inside the theme. Use Code Snippets or your own custom plugin to customize Directory. For customization details open the Directory customization article.
4 – Website link
Points to the URL the author provided inside the “Website” field. This field can be modified from Tevolution ⇨ Custom Fields.
5 – Claim Ownership
This feature visitors to claim listings on your site as their own. This is particularly useful in the early days of the site since you (the admin) will most likely add a lot of content yourself in order to make the directory appear bigger. For setting up this feature please open the Tevolution guide.
6 – Send to Friend form
Allows the visitor to send a quick email (containing a link to the listing) to a friend. This form can be disabled from Tevolution ⇨ Settings ⇨ Email Settings & Notifications (tab) ⇨ Detail Page forms.
To enable captcha for this form navigate to Tevolution ⇨ Settings ⇨ Captcha.
7 – Send Inquiry form
Allows visitors to get in touch with the listing author, i.e. the person who submitted the listing to the site. This form can be disabled from Tevolution ⇨ Settings ⇨ Email Settings & Notifications (tab) ⇨ Detail Page forms. To enable captcha for this form navigate to Tevolution ⇨ Settings ⇨ Captcha.
How can a get a copy of inquiry emails sent to authors?
You can do that by customizing the tevolution_send_inquiry_form() function located inside /wp-content/plugins/Tevolution/tmplconnector/monetize/templatic-generalization/general_functions.php. Or… you can go to Plugins ⇨ Add New ⇨ Upload and install this simple plugin. It contains the customized function.
https://templatic.com/docs/wp-content/uploads/2014/10/directory-inquiry-tweak.zip
The plugin will send copies to the email address defined in wp-admin ⇨ Settings ⇨ General.
8 – Add to favorites button
The favorites button allows website visitors to save specific listings for later viewing. Once saved (favorited), the listing will become available inside the visitors front-end profile, under the “My Favorites” tab. Screenshot.
9 – Social buttons
These buttons are created based on the values entered inside the Facebook, Twitter and Google + field. You can edit these fields from Tevolution ⇨ Custom Fields.
10 – Detail page sidebar
To edit this area go to Appearance ⇨ Widgets and place widgets inside the “Listing Detail Page Sidebar” area. The widgets used inside the image above are:
- Text (simple image displayed with HTML)
- T – In The Neighborhood
- T – Browse by Categories/Tags
11 – Tabs
These tabs are displayed automatically as long as a value is provided for the field. For instance, if the “Video” field stays empty, the tab won’t show.
If you want to tinker with the code for this area do it in \wp-content\plugins\Tevolution-Directory\templates\directory-listing-single-content.php around line 50. Please note that this path is specific to the Directory parent theme. It won’t work if you’re using a child theme or you’re trying to edit an Event or Property.
12 – Gallery images
When adding listings from the back-end these images can be set by using the “Image Gallery” section inside the right sidebar. The first image inside the gallery will display as the main image inside the post. Please note that these images must be uploaded for that specific post (don’t try loading images from the gallery).
13 – Actual listing content/description
This is the text added inside the “Listing Description” field in the front-end, or the main content box inside the back-end. The area can display HTML and Shortcodes.
14 – Share buttons
You can enable or disable specific sharing buttons from Tevolution ⇨ Settings ⇨ Detail Page ⇨ Show sharing buttons.
15 – View counters
These display how many times the listing was visited today and also since submission. You can enable or disable view counters from Tevolution ⇨ Settings ⇨ Detail Page ⇨ View counters.
16 – The listings category
This area displays the categories in which the listing is submitted. If you want to remove it, just add this to Appearance ⇨ Custom CSS Editor
.bottom_line {
display: none !important;
}
17 – Previous/Next buttons
These buttons allow visitors to quickly navigate to the next listing within the same category as the one being displayed. If you don’t need these, hide them by adding the following code to Appearance ⇨ Custom CSS Editor.
.pos_navigation {
display: none !important;
}
18 – Comments/Reviews
Comments can be moderated from wp-admin ⇨ Comments. You can also see reviews after opening the listing in the back-end. Certain comment settings are also available from the Appearance ⇨ Theme Settings ⇨ Comments Settings (tab) section.
19 – Submit a comment/review
If you want to disable comments for a specific listing the best way is to Quick Edit it (from wp-admin ⇨ Listings) and untick “Allow Comments” in the quick edit window.
To disable ratings and use regular comments go to Tevolution ⇨ Settings ⇨ Detail Page ⇨ Ratings. If you want to make it so that a rating must be provided while submitting a comment, turn on the “Force Ratings” option.
20 – Related listings
This section shows listings from the same category (or tag) as the one currently displayed. For editing related listing settings navigate to Tevolution ⇨ Settings ⇨ Detail page. There are several options available that control the Related Listings section.
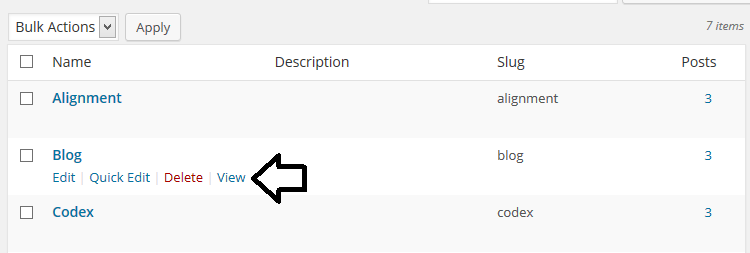
Setting up the Blog
The Blog in Directory is essentially just a category holding individual posts. So… follow these steps to create a Blog
- Create a new category in Posts ⇨ Categories and name it Blog.
- Add posts to that category by going to Posts ⇨ Add New.
- By adding the posts our Blog page was automatically created. You can see it by going to Posts ⇨ Categories and clicking on the “View” link
Quick tips
- To increase the number of entries available per-page on category pages (default is 5), go to wp-admin ⇨ Settings ⇨ Reading and change the value associated with the “Blog pages show at most” option.
- I also recommend adding this Blog category to your navigation menu. Do that by going to Appearance ⇨ Menus and creating a new menu. Expand the categories dropdown, choose “Blog” and hit “Add to menu”. For details on creating custom menus watch our video tutorial.
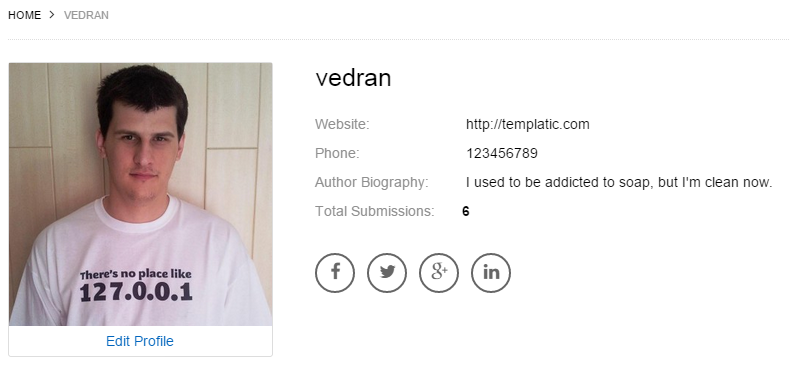
Author page (user dashboard)
This is the page that opens when you visit a user profile within the theme. Each users profile page can be accessed from a URL like this one: your-domain.com/author/the_username. Another way to access it is by clicking on your username inside the top navigation bar. To change the author slug inside that URL visit the Tevolution ⇨ Settings ⇨ Custom Permalinks section and change/remove the Author Base.
From the dashboard page all website users can manage their submitted listings, favorites and of course their own profile. The best part of the dashboard page is that you can control exactly which info appears there. Go to Tevolution ⇨ Custom Fields ⇨ User profile fields to edit existing profile fields or add new ones.
Note: When creating a new profile field make sure to check-mark “User dashboard page” within the “Show the field in” option. If you don’t, the value won’t show inside the user dashboard page.
How to add the ‘Post’ tab on Author pages in Directory-based themes
You can add a “post” tab to the author profile on your directory website with simple steps. Use this guide to see how you can add the ‘post’ tab on author pages.
What do the edit, renew, upgrade and delete buttons mean?
This screenshot showcases which buttons I’m talking about.
Edit: This button displays while the listing is still active (package duration/alive days haven’t passed). The form that opens will be very similar to the actual submission form. The most important thing missing are the price packages. If you have WYSIWYG Submission installed, the edit process will also be in WYSIWYG format.
Renew: This button shows once the listing expires, it allows visitors to edit/update their listing and then pay for it to be submitted on the site again. Price packages do display inside the renew form.
Upgrade: Almost identical to the Edit form, however it allows visitors to select a different price package.
An option for upgrading a listing is available inside the user dashboard. Clicking on this button will allow the user to choose among the more expensive packages. He can choose the package he wants and pay for it. This will upgrade his listing and the benefits of the new package will be applied to it. The upgrade button will be available till the listing is active. Once it expires the “Upgrade” button will be replaced with a “Renew” button.
This feature of the theme can be considered as a monetizing factor for a website owner and a flexibility for the subscribers.
Delete: Deletes the listing. Listings deleted from the front-end user dashboard will also be deleted (forever) from the back-end.
How to edit my profile?
Each user can edit their profile from this URL: your-domain.com/profile. A link to this page is also provided underneath the avatar inside the author/dashboard page. To modify the profile page, go to Pages ⇨ Add New and edit the “Profile” page. The profile page is a regular WordPress page with a shortcode that generates the profile fields. This allows you to easily add new content inside the page (above or below the profile fields) or to change its title or slug.
If you accidentally deleted the profile page, re-create it by following these steps:
- Go to Pages ⇨ Add New and create a new page. Enter whichever title you want.
- Insert the following shortcode as the content for that page
[tevolution_profile]
- Go to Tevolution ⇨ Settings ⇨ Registration Page and choose the page you just created within the dropdown for the “Profile Page” option.
How to edit profiles from other users?
As the admin, you can edit profiles from all members by going to the wp-admin ⇨ Users section.
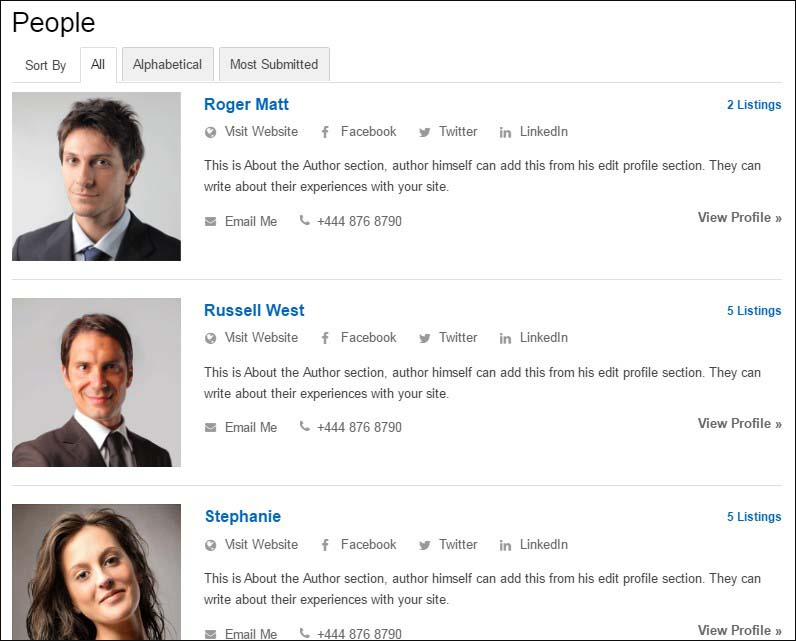
How to create “People” page as seen on the demo?
The people page in the Directory WordPress theme shows all the authors of the website. Clicking on the author name will lead the users to the Author page where they can find all their listings at one page. The users can also connect with the authors with the social network links.
The screen shot shows a people page.
The sort options are –
All : will show all the authors.
Alphabetical : The alphabets will be shown, you can click on the alphabet and all the users with that initial will be shown.
Most Submitted : The author with greatest number of listings will be shown first.
Use
The users can select their favorite author and see all his listings. This allows him an easier way to search the website.
This is the page in question. It has been automatically created when you installed the theme. You’ll find it inside the wp-admin ⇨ Pages section.
If you accidentally deleted the people page, re-create it by following these steps:
- Go to Pages ⇨ Add New and create a new page. Enter whichever title you want.
- Insert the following shortcode as the content for that page
[tevolution_author_list role='subscriber' users_per_page='8'][/tevolution_author_list]
Custom Fields
Along with custom post types and price packages, custom fields are one of the pillars of Tevolution. Custom fields are used to associate custom information with a listing. This listing can be a regular WordPress post, page or a custom post type that you created. These fields are the most important part of a submission form, without them visitors couldn’t submit anything on your site. In short, when you open a page such as this one, most of the content you see is manipulated by custom fields.
To start tweaking your custom fields navigate to Tevolution ⇨ Custom Fields.
Adding and managing custom fields
Add a new custom field
You can add a new field by navigating to Tevolution ⇨ Custom Fields Setup ⇨ Add a custom field. Listed below are all the options/field appearing inside the “Add a custom field” form.
Enable for
Choose the post types with which you want to use the new field. This allows you to have totally unique sets of custom fields for each post type.
Select the categories
Similar how a field can be specific to a certain post type, it can also be specific to a category within a post type. Category-specific custom fields are turned off by default, however you can easily activate them by navigating to Tevolution ⇨ Settings ⇨ Submission page and enabling the “Show custom fields categorywise” option.
If you have category-specific custom fields turned off I recommend selecting all available categories when creating a custom field. This will make them show inside the submission form even if you enable the option somewhere down the line.
Heading
By selecting the heading you are essentially deciding how the field will be grouped. Most Templatic themes come with at least two grouping areas: taxonomy_name and Contact Information. Simply choose the group that you find more appropriate for your field.
New groups can be created by adding a custom field and choosing the “Heading” field type.
Label of Field option will transform the label of your field into a heading. This is useful for big input types like Text Editor.
Type
By setting the type you decide what kind of input will visitors see. Will it be a simple text field or a multi checkbox with lots of options? You decide by choosing a field type. Most field types are self-explanatory so I’ll just explain those that aren’t.
Geo Map – used to generate a location using a map. If you’re using a Templatic theme, chances are you already have this field inside your submission form. Please note that you cannot have two Geo Map fields inside the same form. This field type is provided in case you need map-related features inside your custom post type.
Heading – creates a new group for your custom fields. More info about the heading type is available in this paragraph.
oEmbed Video – allows visitors to add a video by simply pasting links from YouTube, Vimeo and other sites. For a list of supported sites click here.
Post categories – gives the ability to choose a category inside the front-end submission form. Templatic themes come with this field built-in; you don’t need to add it manually. Use this only with your custom post types.
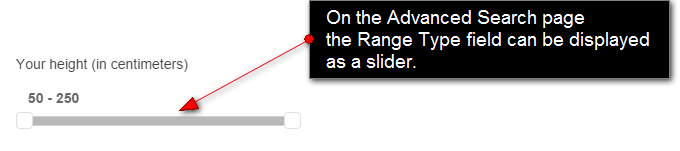
Range Type – a simple text field with the ability to work with a pre-defined range of values. It’s also the only field type designed to work as a Range Slider inside the search form. The range for the “Range Type” field is set inside the “Show on search as” option within the “Display Options” section. Choose the “Range Slider” option and then set the min/max values. For example, let’s imagine you are creating a field called “Your height (in centimeters)”. Let’s set 50 as the minimum value and 250 as the maximum. All those filling out the submission form will have to choose a number within this range.
Select/Radio/Multi Checkbox – these are fields used for selecting pre-defined options. Select and Multi Checkbox allow visitors to select multiple options, while the Radio buttons allows only one to be selected. All three of these field types work as associative arrays. They allow you to set a key and a value for that key. Of course, both the key and the value can be identical.
Label
The name of your field. If you selected “Label of Field” as the heading, this name is what will be used as the heading.
Unique Variable Name
Also sometimes referred to as the “HTML variable”, this is a unique key that defines the field inside the database. Functions such as get_post_meta() use the Unique Variable Name to display information. It’s important that you don’t use any spaces, numbers, special characters or capital letters when defining the variable name. Stick to small letters and underscores ( _ ).
Description
The text displayed below the input area. Use it to provide more details about the field and (if necessary) how to use the field.
Default value
You can use this as an example of how should a value be entered. The default value will disappear as soon as visitors start typing their own information.
Active
Make sure this option is checked. The field won’t work otherwise.
Want to add validation?
Enable this option if you want to force visitors to provide a value to this custom field. Once you enable this two more options will appear.
Validation type
Choose the type of validation you want to force upon the field. Keep in mind that not all field types work with all validation types. For instance, the Text Editor field only works with “Require”.
Required field warning message
This is the message that will display to visitors if they forget to fill out the field.
Position (display order)
Controls the position of your custom field within the group it’s in. Another way to tweak the position is from the Tevolution ⇨ Custom Fields Setup screen. You can change the display order by simply dragging and dropping custom fields in the desired spot.
Display location
Choose whether to show the field inside the back-end, front-end or both.
Show the field in
This section let’s you control where will the field (or in most cases, its value) be displayed. If you’re creating a field where the values are private (for your eyes only) make sure to deselect all options accept “Submission form” and “Back-end”. Selecting options such as “Advanced search form” will reveal additional options to enter. You’ll be able to select how is the field presented inside the advanced search form.
CSS Class
In this option you can enter a CSS class that will apply to the label of the custom field that you’re creating. This allows you to make the field stand out from the rest. The place where you can define/write the class is custom.css. For instance, to change the color of the label and to increase the font size we would add something like this
.mycustomclass {
color: red;
font-size: 20px;
}
Once the class is created enter the class name ( mycustomclass ) inside the CSS class field.
In the above example, the end result would look like this

Extra Parameter
Unlike the CSS class option that controls the label, this option controls the input field itself. We control the field by defining attributes for the HTML input tag.
For instance, to define a placeholder for the field we would input something like this
placeholder="my placeholder text"
In that case the end result would be…

Managing custom fields
To manage custom fields navigate to the Tevolution ⇨ Custom Fields Setup section. Here are some tasks you can complete from that section
Order fields
Field position can be changed either by setting the sort order number while creating the field or by dragging and dropping the field inside the Custom Fields section. After the field has been created the sorting order can only be changed from the Custom Fields section.
Please note: A custom field position greatly depends on the position of its heading (group). In other words, the changes you make by dragging and dropping fields inside Tevolution ⇨ Custom Fields are affecting the field within its group, not the submission page as a whole. Let’s assume the “Contact Information” heading is displayed at the bottom of the submission page. Within that heading group there is a “Facebook” field. Setting the sorting order of that field to 1 won’t display it at the top of the submission page, it will just display it at the top of the “Contact Information” group.
Quickly change the heading type
You can change the heading type of a specific field by clicking on the dropdown under the “Heading Type” column. Screenshot.
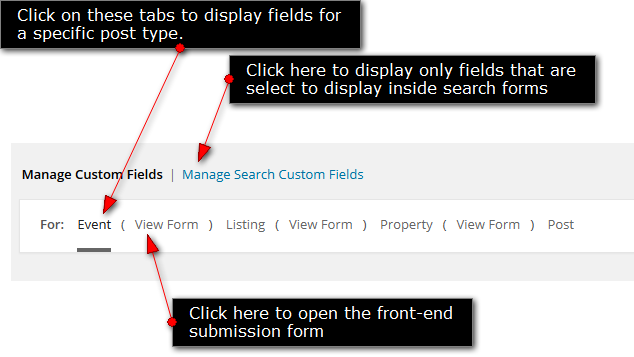
Change which fields are displaying
By clicking on tabs at the top of the page you select to display only fields for a specific post type, or only search-related custom fields.
Reset custom fields
Click on the “Reset Custom Fields” button at the bottom right corner of the page to discard all your changes and start over.
Choose how many fields display per-page
Click on the “Screen Options” button at the top right corner of the page and set the number of fields to show per-page.
User Profile Fields
Profile fields are essentially custom fields for the register form. You can manage them from Tevolution ⇨ Custom Fields ⇨ User Profile Fields. To add a new field just click on the “Add a new field” button at the top. The fields inside the form are fairly self-explanatory. They are also similar to “regular” custom fields. You can read more about those here.
Here’s an example of a profile field
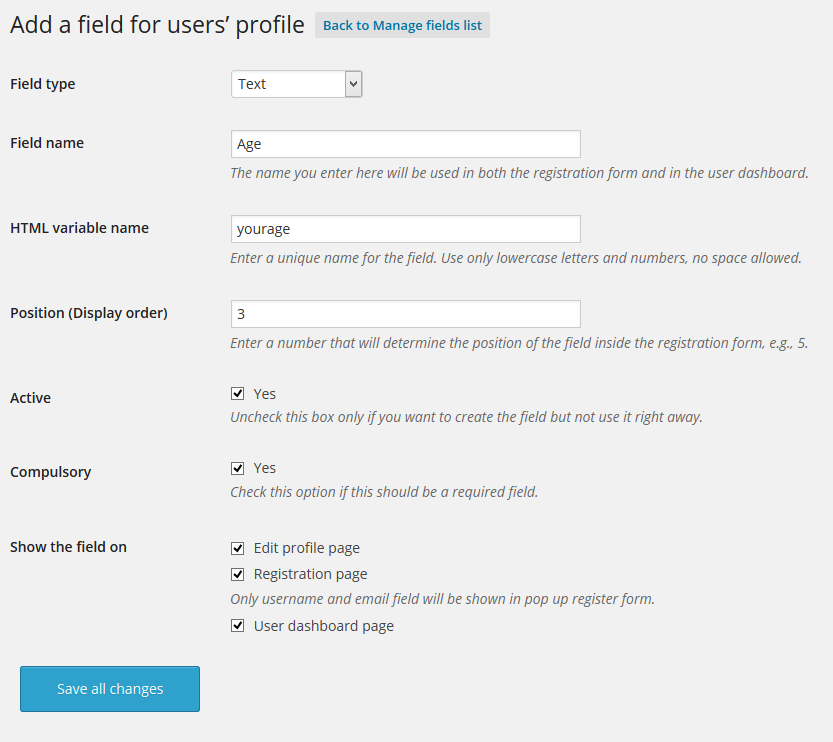
The default location of your register form is http://your-domain.com/register. That’s where your newly added user profile fields will appear (assuming you set them to display inside the register form).
Custom Post Types
Post types in WordPress are essentially a new way to organize your content. Instead of relying on just posts and pages, you can create new types such as “Places”, “Reviews” or “Testimonials”. Each of these post types will then come with matching taxonomies (categories and tags). If you’re interested in learning more about custom post types be sure to read this codex article.
Directory comes with one post type per-installed, “Listing”. You can add additional post types such as Property, Event or Classified by installing premium add-ons. I recommend you don’t create new post types unless there is a clear need for them. If you can organize your content using categories, do that – it’s much easier.
Create a new post type
To start creating a new post type navigate to Tevolution ⇨ Custom Post Types ⇨ Add Custom Post Type. Fields inside this section are fairly self-explanatory so I won’t be going into any details. However, keep this in mind:
- Each slug you enter must be unique!
- Slugs shouldn’t contain any numbers, capital letters, spaces or symbols. Use only small letters.
- Enable the “Category-specific map markers” option if you plan on displaying content from your new post type on a map.
Setting up a new post type
After creating the post type you’ll need to create some other things as well in order to make it useful. Most important of which are…
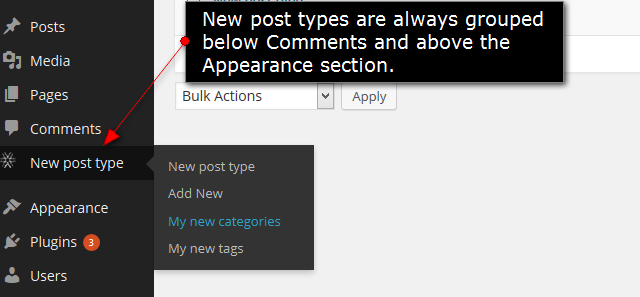
Categories
You can add categories by expanding your post type and selecting the categories option. New post types are always grouped between the Comments and Appearance sections inside the wp-admin sidebar area.
Custom fields
Creating new custom fields will allow you to define what kind of information you and your visitors submit for the new post type. By default you can only enter a post title, description, images and excerpt. By creating new fields you can create input fields with radio buttons, file uploaders, checkboxes, etc.
Custom fields can be created from Tevolution ⇨ Custom Fields Setup. To learn more about custom fields click here.
Price packages
Price packages need to be defined if you plan on allowing visitors to submit content (for your new post type). They are displayed at the bottom of the submission form.
To learn more about price packages click here.
Submission form
Along with price packages, generating a submission form is also necessary in order to allow visitors to submit content. This submission form will contain all the custom fields and price packages you created for the new post type. Follow these steps to generate a submission page:
- Navigate to wp-admin ⇨ Pages ⇨ Add New.
- Set the page title to whatever you want.
- Paste the following code to the main (description) box
[submit_form post_type='POST_TYPE_SLUG']
- Publish the page.
POST_TYPE_SLUG is the slug you set while creating the new post type. Example…
[submit_form post_type='listing']
[submit_form post_type='event']
Customizing the new post type
If you’re skilled with HTML, CSS and PHP you can customize the appearance of category and detail pages of your new post type. To do that follow these steps:
- Connect to your server and navigate to /plugins/Tevolution/templates.
- Create a copy of single-tevolution.php (detail page) or taxonomy-tevolution.php (category page), depending on which page you want to customize.
- Paste the copied file to your theme root folder.
- Rename the file by changing the tevolution part to match your post type and taxonomy slug. For example: single-event.php / taxonomy-ecategory.php
- Open your new file (inside the theme root folder) and make the changes you want. Tevolution will display your changes as soon as you save & upload the file; no additional tweaking is necessary.
Monetization & Price Packages (making money)
Price Packages are the primary method of making money inside Directory. Once created, these packages appear inside submission forms. Visitors must select a price package before they can proceed with submitting a post. If you don’t plan on allowing front-end submissions, you also don’t have to worry about creating price packages.
Create a price package
To create a price package navigate to Tevolution ⇨ Monetization ⇨ Price Packages (tab) ⇨ Add New Package. Most of the fields inside this form are self-explanatory so I’ll focus on explaining those that deserve extra attention.
Package Type
The first option you make while creating a price package is also the most important one. You can choose between two types: Single submission and Subscription.
Single submission
Price packages created with this type allow authors to submit just one listing. In other words, 1 payment = 1 submission.
Subscription
These packages will allow authors to submit multiple listings for a single payment. You can define exactly how many listings can be submitted and in which time frame.
Number of posts (sub)
This option allows you to define the number of submissions available inside the package. It’s one of many parameters you can use to differentiate price packages. Charge more for packages that allow visitors to submit more posts. This option will work commonly for all the post types associated with the Tevolution plugin.
Select post type & Select categories
The price packages you create are both post type and category specific. If you want to create a universal price package (for all post types and categories) check the “Select All” button in both options.
Amount
This is essentially the price of your package, i.e. the amount people will have to pay in order to purchase the package. Avoid entering thousand separators inside the field, enter just the number value. Enter 0 to make the package free.
Package Duration
The value entered here controls the validity / alive days for all posts submitted with that particular package. If you set it to 30 days, all posts submitted using the package will be active for 30 days. After 30 days they will expire.
Allow users to submit listing within following days (sub)
The time restriction for your price package. Define how many days visitors have to submit their posts. Enter just the number in this field. Similar to the “Number of posts” field, this is another parameter for differentiating packages. Charge more for packages that give visitors more time to submit their posts.
Allow one submission before payment (sub)
Enabling this option will allow visitors to make a submission while purchasing the subscription price package, i.e. before they actually complete the payment. Otherwise, they won’t be able to submit anything until the payment is processed. This submission will be deducted from the overall “Number of posts”.
Number of free posts allowed (sub)
Use this option if you want to allow a preset number of free submission before paying for the subscription price package. The option is very similar to the “Allow one submission before payment” setting. However, these free posts aren’t deducted from the overall “Number of posts” once an actual payment is made.
Recurring package
By creating a recurring package you can automatically charge your members at the end of the billing period (that you define). Once they are charged their submitted listings are automatically renewed.
-Billing Period for Recurring package
Choose how often should visitors be billed. This value should match the “Package Duration” field.
-Number of cycles
Set the number of repetitions (recurrences) for the package. For example, if you set the billing period to 1 month and the number of cycles to 12, your visitors will be automatically billed for 1 year. For unlimited billing cycles just enter a big number here.
-Free trial period
This option allows visitors to get the full package benefits during the first billing period. During checkout they will essentially purchase the subscription, but won’t be billed for it until the second billing period.
Featured options
Featured listings are differently-styled listings that appear first on homepage or category pages. Some widgets even allow you to display just featured listings. In other words, they provide more exposure which is why you can charge extra for this privilege.
To reveal additional featured options check the “Home Page” or “Category page” boxes.
Homepage/Category page featured price
Set the price listing authors will need to pay in order to make their listings featured. Check the “Package amount includes the homepage/category page feature price” box if you want to make the listings submitted with this package featured by default.
Featured status duration
Define how long the listings will be featured by entering a number (of days). If you don’t enter anything here listings will be featured for the full duration of the package (the time entered under “Package Duration”).
Note: In case if you are not able to save package type because of larger number of categories, we should need to increase a value for a variables “max_input_vars, post_max_size” directly from your php.ini file located at server end.
Currency Settings
From Tevolution ⇨ Monetization ⇨ Currency (tab) you can setup the plugin to use your own currency (default is USD). Be careful when entering the three letter ISO currency code since a badly defined currency code will prevent the payment gateways from working. For the full list of ISO currency codes open this link.
Popular currency symbols and codes
- British Pound: £ – GBP
- Euro: € – EUR
- Canadian Dollar: $ – CAD
- Indian Rupee: ₹ – INR
- Australian Dollar: $ – AUD
- Japanese Yen: ¥ – JPY
If you need to change the location of the symbol in relation to the value, tweak the “Currency Position” option. These are the options…
- Use currency symbol as prefix – $10
- Space between amount and prefixed symbol – $ 10
- Use currency symbol as suffix – 10$
- Space between amount and suffixed symbol – 10 $
Payment Gateways
From Tevolution ⇨ Monetization ⇨ Payment Gateways (tab) you can control the available payment methods on your site. By default Directory comes with two payment methods.
- PayPal – used for online payments. You will need to create a PayPal account before you can use it. To setup the payment method just enter your PayPal email, i.e. the email you used to sign up for PayPal.
- Pre Bank Transfer – used for offline payments. After submitting a listing, authors will see your bank account details along with the amount required to pay. Once you verify the payment (by checking your bank account) proceed by confirming their submission in Tevolution ⇨ Transactions. Don’t forget to add your own bank details by editing the Pre Bank Transfer payment method.
Transactions
From Tevolution ⇨ Transactions you can approve or deny all transactions that happen on your site, i.e. within your submission forms. You can also use this section to search for specific transactions and even export search results into CSV files.
By default, paid PayPal submissions will be automatically approved while free submissions and paid Pre Bank Transfer submissions will be automatically drafted. You can change these settings from Settings ⇨ Submission page.
Approving a transaction
- Navigate to Tevolution ⇨ Transactions.
- Checkmark the transactions you want to approve.
- Click on the “Bulk Actions” dropdown and choose “Approve”.
- Click on “Apply” to confirm the change.
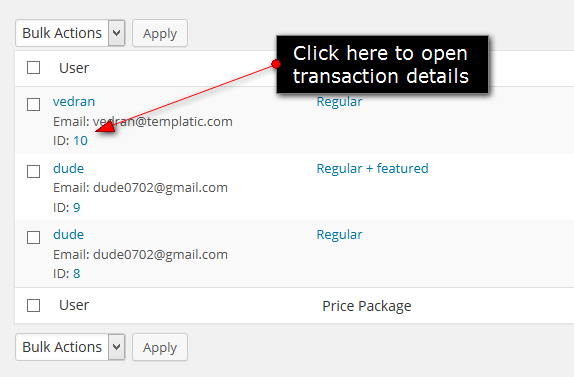
To see transaction details click on the transaction ID
Alternate way to display Price Packages
The way price packages are displayed inside the submission page isn’t all-that pretty. There’s a lot of dynamic information to show so there isn’t a lot of room for experimentation. However, there is an elegant way to make price packages look pretty. After creating a price package, Directory provides you with a link to that price package inside the submission form. You can reveal it by clicking on “Short Link” while in Tevolution ⇨ Monetization ⇨ Price Packages (tab).
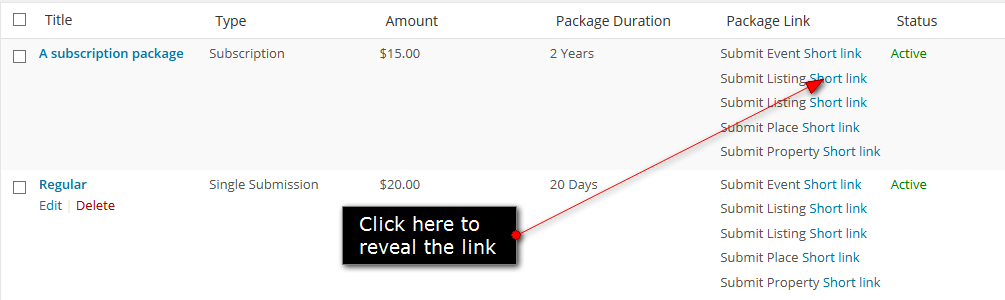
The Short Link you just copied will open the submission page with the price package auto-selected. This allows you to create a totally new page and describe your price packages there. The actual submission can then be initiated by clicking on a button that’s linked to a specific price package. Pricing tables are a good way to display this type of information. I created the below table in literally 5 minutes using the Easy Pricing Tables plugin. I’m hoping yours will be far less ugly than mine 🙂
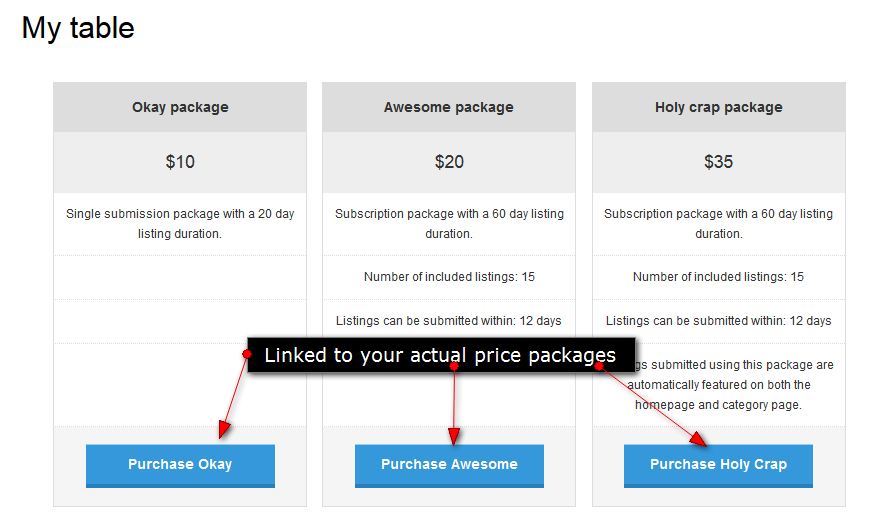
Generate pages
Directory allows you to create advanced pages using a number of different shortcodes. These shortcodes can be inserted into other content types as well (posts, listings, etc), but are best used with regular WordPress pages.
Start by creating a new page from wp-admin ⇨ Pages ⇨ Add New. Most shortcodes can be inserted into pages by using the Templatic shortcodes button located inside the Visual editor.
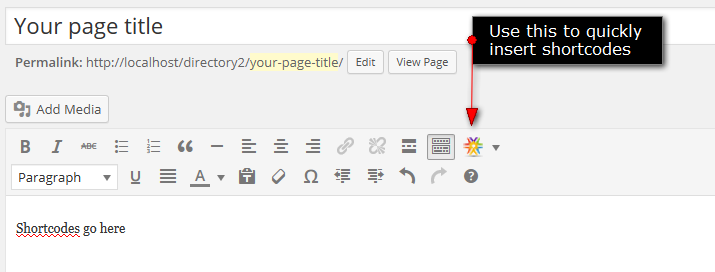
Submit pages
Submit pages (e.g. “Submit Listing”) are used to submit content from the front-end. They combine all three areas explained earlier in the guide; Post types, Custom fields and Price packages. These pages are usually generated automatically by the theme or plugin you’re using alongside Tevolution. To manually create such a page simply paste the following shortcode.
[submit_form post_type='']
post_type – enter the slug post type you want to use. For example…
[submit_form post_type='listing']
[submit_form post_type='event']
Register, login and profile pages
Directory will try to generate these three pages as soon as you activate the plugin. However, in case you can’t see them inside wp-admin ⇨ Pages section, use the following shortcodes to generate them.
Login
[tevolution_login]
Edit Profile
[tevolution_profile]
Register
[tevolution_register]
Why is there no password field when registering?
This is because passwords are automatically generated and sent the users email (the one entered while registering). This passwordless register process is standard in WordPress. Unfortunately there is no easy way to add a password field to the register form.
What is the difference between the register form and the register link/popup?
The register link (the one located inside the theme header) opens the popup for those that want a quick and painless register process. The popup doesn’t contain custom register fields and always features just two fields; username and email.
Map pages
Even though most Templatic themes come with homepage and category page maps, sometimes that’s not enough to display all relevant content. Map shortcodes allow you to generate maps within regular pages.
Multi post type map / Full width map
This map can display listings from any of your post types. It will display all available listings regardless of the current city. To generate the map enter this shortcode:
[tevolution_listings_map post_type="" image="thumbnail" latitude="" longitude="" map_type="" zoom_level=""]
This map also has the ability to display over the whole page. Here’s an example. To activate the full width mode change the page template to “Full Width Map”.
Single post type map
Use this map if you want to focus on just a single post (e.g. listings). The map will display all available listings regardless of the current city. To generate the map enter this shortcode:
[map_page post_type="" image="thumbnail" latitude="" longitude="" map_type="ROADMAP" map_display="ROADMAP" zoom_level="13" height="500"]
Map shortcode options
post_type – define which post types should the map display (e.g. “event,listing”).
image – define which image size should the map use. Keep this set to “thumbnail” unless you know what you’re doing.
latitude and longitude – set the focus point for the map. You can generate those values on this site.
map_type – available values are: ROADMAP, TERRAINMAP, SATELLITEMAP and STREETMAP.
zoom_level – define how big of an area should the map display. The larger the number, the more zoomed in the map is. 12 or 13 is a good zoom level for focusing on a city.
People page
People page lists authors on your site and displays some basic information about them. Here’s an example of such a page.
You can generate this page by entering the following shortcode inside any WordPress page or post:
[tevolution_author_list role="" users_per_page=""]
role – define which users should be displayed on the page (authors, editors, subscribers, etc). You should mostly keep this set to “subscriber”.
users_per_page – define how many users to show on each page.
If you want to customize this page, you can do so by editing this file: wp-content/plugins/Tevolution/tmplconnector/shortcodes/shortcode_people.php
Directory Settings
Outside of features such as custom fields and price packages, the majority of settings in Directory are available within the three sections mentioned below: Tevolution ⇨ Settings, Appearance ⇨ Theme Settings and Appearance ⇨ Customize.
General Settings
Accessible from Tevolution ⇨ Settings ⇨ General Settings (tab), this settings area is where you can make most Directory changes. Most of the settings are pretty self-explanatory so I’ll focus on those that require additional explanations.
Submission Page
Submission pages are used to submit content from the front-end. For details on how to create such a page open this part of the guide. Submission page settings are available from Tevolution ⇨ Settings ⇨ Submission Page.
Category specific fields
By default each custom field you create will work with all categories created for a specific post type. If you enable this option, fields not selected to show for a specific category will disappear from the submission form as soon as that category is selected.
Category display
The choice you make here will determine the look of the categories field inside the submission form. Available choices are: Checkbox, Multi-select and Select. Checkbox and Multi-select allow visitors to select multiple categories while Select allows only one to be selected. Here’s a screenshot of how each of them looks like.
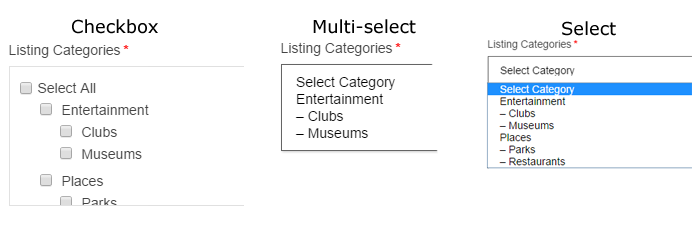
Default status for free/paid submissions
Decide what happens when someone submits a listing. Is it drafted or published? Drafted listings can be approved (i.e. published) from the Tevolution ⇨ Transactions section.
Category Page
The options you set here control your category and tag pages. For example: your-domain.com/listingcategory/places.
Default page view
Choose the default style for category page listings. Each visitor will be able to change their view at any time by using the view switches provided in category pages. Screenshot.
Map view
This option enables/disables the map tab in category pages. Keep the option turned off if you plan on using category page map widgets.
Note: To enable the big category page map (as displayed in our demo) go to Appearance ⇨ Widgets and place the “T – Category Page Map” widget inside the “Listing Category Pages – Below Header” area.
Pinpoint functionality
This feature allows visitors to bring up a listing on the category page map. They do it by clicking on the “Pinpoint” icon. This functionality only works when “Map view” is turned off.
Sorting options
These are the options appearing inside the sort dropdown in category pages. Certain Directory add-ons can enable additional sorting options. Screenshot.
Detail Page
Detail page is the specific/individual page for a post, listing, event or whichever custom post type you created.
Filter related posts by
Depending on which option you choose, related posts (displayed below the main content inside detail pages) will be shown either from the same category as currently viewed post or from the same tag as the currently viewed post.
Show Ratings
Ratings are essentially those little stars that display while entering comments (and in various pages throughout the theme). Assuming you’re using Directory, if you want more rating-related options check out our Multi Rating plugin.
Registration Page
In this section you can connect your previously created registration pages with the matching options. As mentioned earlier, these pages should be created automatically as soon as you install the plugin, chances are you don’t need to tinker with it.
From this section you have the ability to setup social login through Facebook, Google and Twitter. After clicking on each checkbox, the plugin will request your APP ID and Secret Key. Follow the steps below for instructions on creating a new app for each platform.
Creating a Facebook app
- Access to your site backend Tevolution >> Settings >> Registration Page (tab) and enable the option of Facebook.
- You will see to insert App Id and Secret Key. Click on the link below the field and you will be redirected to Facebook Login page.
- Login to your Facebook account or create a new one.
- Open the Facebook Developers page. Allow developer access if you get prompted for that.
- Inside the top left corner click on + Add New App.
- Add your Display Name and Email that you want to show when users Login through Facebook.
- You will see multiple options and in that you need to select Facebook Login and click on the Set Up button.
- Choose the WEB option and add your site URL for the relevant field and save it.
- Go to Settings option and you need to Choose Basic Settings for your app.
- Choose Category as “Community & Government” and add your site URL in the App Domain field.
- You need to add the Privacy URL for your app to use the Facebook Login to work on your site.
- You will get the Privacy URL from this link https://termsfeed.com/privacy-policy/generator/ and follow the steps shown in the Video.
- After Creating the Privacy URL you need to copy the URL and paste it in your app and save the settings.
- Now to to the App Review Section and you need to enable the app PUBLIC.
- Next go to Facebook Login Settings and enable the option and your site URL and save the settings.
- Final Setup would be Go to Basic Settings and copy the AppID and Secret Key and paste it on your site backend.
-
- Login to your Google account or create a new one.
- Open the Google Developers Console.
- Inside the top right corner of the screen you should see a “Select a project” dropdown. Expand the dropdown menu and click on “Create a project…”.
- Enter your name for the project and leave the rest as-is.
- Once the Dashboard of your new app opens click on “Enable and manage APIs”.
- Search for the Google+ API. Enable that API.
- Once you enable the API you should see a message saying you can use the API until you create credentials. Click on the blue “Go to Credentials” button”.
- Under Where will you be calling the API from? select “Web browser”. Under What data will you be accessing? select “User data”. Go to next step.
- Now leave the Authorized JavaScript origins field empty. Under Authorized redirect URIs enter this URL
http://YOUR_SITE.com/wp-content/plugins/Tevolution/tmplconnector/monetize/templatic-registration/hybridauth/?hauth.done=Google
- Click on the “Create client ID” button below to proceed to the next step. Click the button again if you stay on the same step.
- Enter the email address and product name that should be displayed to visitors when logging in to your app.
- In the Download credentials step click on “I’ll do this later”.
- You should now see this. Click on your Web client

- Now copy the “Client ID” and “Client secret” values available in the “Client ID for web application” section.
- Connect to your site and go to Tevolution ⇨ Settings ⇨ Registration settings. Paste the Client ID inside the App ID field and the Client secret key inside the Secret key field.
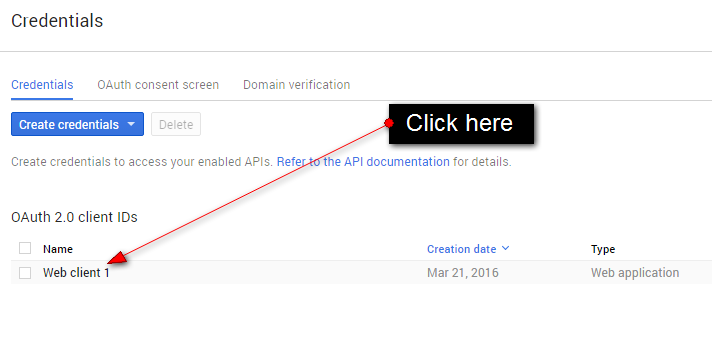
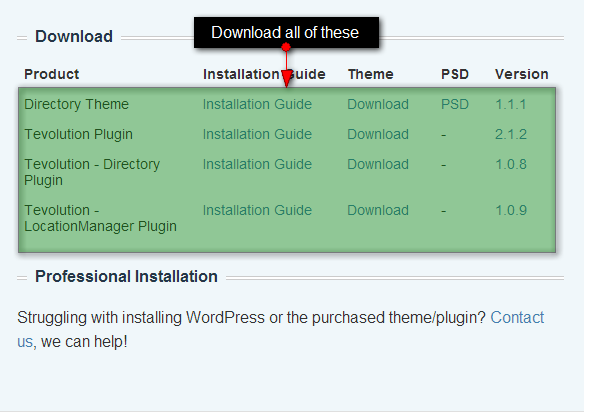
Creating a Twitter app
- Login to your Twitter account or create a new one.
- Open the Twitter dev page.
- Click on “Create new app”
- Inside the “Application Details” fill in the Name and Description you want for the app. Also enter the location (URL) of your site. Enter this as the Callback URL:
http://YOUR_SITE.com/wp-content/plugins/Tevolution/tmplconnector/monetize/templatic-registration/hybridauth?hauth.done=Twitter
- Your app should now be showing. Click on the “Settings” tab and check the “Allow this application to be used to Sign in with Twitter” option.
- Open the “Keys and Access Tokens” tab.
- Copy your “Consumer” and “Consumer Secret” keys
- Paste the values inside Settings ⇨ Registration settings on your site.
Claim Ownership
In this section you can enable claim ownership functionality for specific post types by check-marking them in the “Enable claim ownership for” option. Once enabled, a “Claim Ownership” button will appear inside the detail page of selected post types for all visitors of site except admin user/user who is not owner of that specific post. The claim ownership button can also be generated using a shortcode. The shortcode can be placed inside an actual listing, or inside a text widget.
[claim_ownership]
What is claim ownership?
Claim ownership is a feature that allows visitors to claim listings on your site as their own. This is particularly useful in the early days of the site since you (the admin) will most likely add a lot of content yourself in order to make the directory appear bigger. The Claim Ownership feature will make it easier for you to transfer that listing to the rightful owner when they requests control over it.
How to process a claim?
Submitted claims can be rejected or accepted from Tevolution ⇨ Submitted Claims. To perform an action use the three little icons located under the “Action” column. These allow you to view more information about the claim (including the actual claim text), verify the claim or deny the claim.
Once you click on the verify icon the plugin will automatically assign the listing to the user who submitted the claim. Clicking on “Verify” will also open the listing in question. To confirm that the author change was made check who is set as the Author of the listing. If you can’t see this information click on “Screen Options” in the top right corner and enable the Author field.
Map Settings
Show maps on mobile devices
Maps on mobile devices can often fill out the whole screen, confusing the visitor. Turn this option off in order to hide maps on phones.
Show map in full width
Decide whether to display the map across the full width of your screen or within the regular theme container (1200px). The option controls the actual widget areas in which maps show – not the maps themselves. Any widget placed inside “Homepage Banner” and “Listing Category Page – Below Header” areas will be stretched to full width.
Single city map settings
These options display only when Location Manager is deactivated. The information you define here will be applied to both your homepage and category page map.
For more details on how to use single-city mode click here.
Captcha
Captcha is something you should setup as soon as possible since spambots will start visiting your site and auto-submitting forms just days after you create it.
Follow these steps to get started:
- Navigate to Tevolution ⇨ Settings ⇨ Captcha (tab).
- Use this website to generate captcha keys. Enter those keys inside the “Site Key” and “Secret Key” fields.
- Use the “Enable spam verification for” option to define in which forms captcha should be active.
Emails and notifications
From Tevolution ⇨ Settings ⇨ Email Settings & Notifications (tab) you can manage all emails sent out by the Directory theme. This includes registration emails to admin and user, submission notifications, password resets and more. You can edit each of these emails by clicking on the “Quick Edit” button inside the Email Templates section.
Note: We can not execute additional short-codes (Or short-codes used for other Tevolution email type ), Instead we can only move positioning of the existing short-codes under the same email template.
Outgoing Emails Method
Edit this setting only if you want to modify the layout of outgoing emails. Plugins that modify emails almost exclusively focus on the wp_mail() function. So… make sure you select that option if you want to modify emails via a plugin. An example of a plugin that does this is WP Better Emails. I should mention that this is really just an example, we haven’t tested Directory with this particular plugin.
Detail Page Forms
- Send to Friend: Website visitors will be able to use this form to send the page link to a friend.
- Send Inquiry: Website visitors can use this form to get in touch with the listing author. Keep in mind that if you (the admin) submitted most of the content, questions submitted using this form will go to you.
My emails aren’t being sent, what should I do?
In most cases your emails aren’t being sent because of the email address you entered inside the Settings ⇨ General section. Some hosts (most notably BlueHost) require you to use an email address associated with your hosting in order to work. So, if you have a website called my-awesome-site.com hosted on such a server, make sure the email you enter inside General Settings is something like [email protected].
Another possible reason why emails don’t work is because certain email headers aren’t supported on your server. In the PHP mail() function the “From” address is an additional header (i.e. it’s not required to send the email). If your host doesn’t support them you’ll have to disable those headers. If you think this might be the reason why your emails aren’t working please contact your host for confirmation. If they confirm, contact our support and we’ll tweak the email function on your site.
Permalink Settings
To open this section navigate to Tevolution ⇨ Settings ⇨ Permalink Settings (tab). You can use this section to alter the structure of URLs for individual listings, category pages and other types of pages.
If your tweaks start causing 404 errors in the front-end click on the “Reset all rules” button to undo your changes.
Theme Settings
To see available theme settings please navigate to wp-admin ⇨ Appearance ⇨ Theme Settings.
Global layout
This option controls the overall look of pages on your site (include the homepage, category page and detail page). Available options are…
- One Column – just the main content area (no sidebars anywhere)
- Two Columns, Left – content on the left, sidebar on the right. This is the default layout
- Two Columns, Right – content on the right, sidebar on the left.
Right-to-Left (RTL) text orientation
Enable this only if you translated the theme into languages such as Arabic or Hebrew. Otherwise leave it disabled.
Sticky header
Enable this if you want to show your navigation menu even when scrolling down the page.
body .sticky_main {
opacity: 0.8;
}
Set the opacity value between 0.1 and 1. Click here for more information.
Breadcrumbs
Breadcrumbs are essentially the path from the homepage to the page the visitor is on. If you don’t need them, just turn off this option. In Directory, the post type (e.g. Listing) is a valid part of the breadcrumb and can’t be removed without tweaking the code. Screenshot.
Google Analytics tracking code
Paste your Google Analytics code in this area. If for some reason it doesn’t work you should open the header.php file (from Appearance ⇨ Editor) and paste it in between the ⇨ head ⇨ tags.
Mobile app view
By enabling this option you can alter the look of your site on mobile phones. When turned off the “regular” responsive design will be used. This mode is designed specifically for smartphones and won’t appear on tablets or desktops (when you resize the browser window).
Key differences between mobile app view and desktop view are
- Site header is designed in a different way. For city selector and search there are icons on which users can click. It’s worth noting that header design can depends on the child theme that’s currently active.
- Homepage: Listing title and address with image will be available. No content/excerpt/custom fields will be displayed.
- Listing Category Page: List and Map view are provided.
- Listing Detail page: Different icons are given for mail, phone, etc…Clicking on “call” icons directly calls the number from the phone.
- Listing Detail page: Information such as map, special offer, description, etc… are provided as accordion instead of tabs to have a better look.
- Listing Detail page: Popups like Send Inquiry or Send to Friend are not provided.
- Sidebar contents which is available in desktop view is not given in to the mobile view.
- Footer widget area is not displayed inside the mobile view.
Here’s the homepage and detail page with the mode ON and OFF
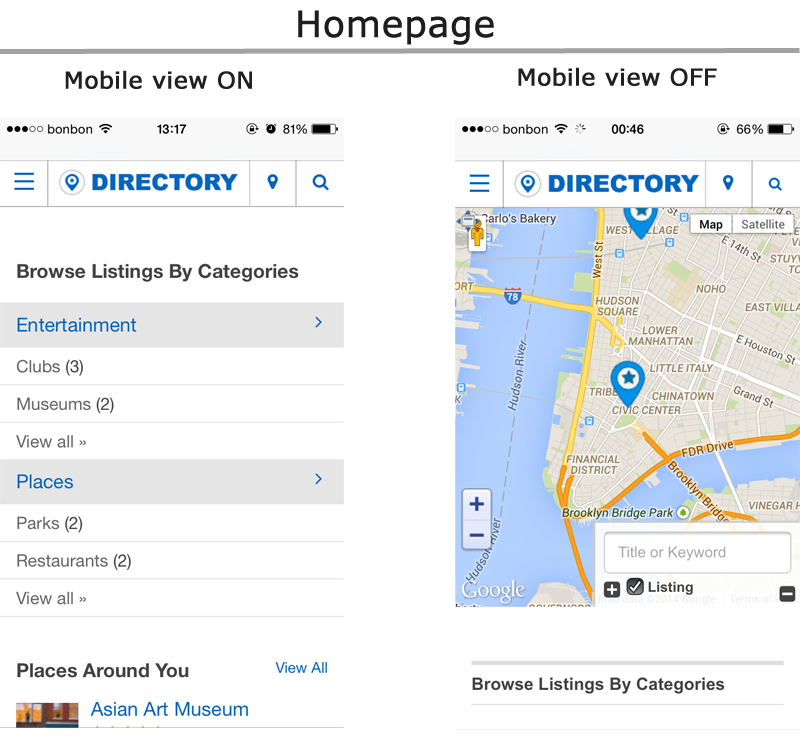
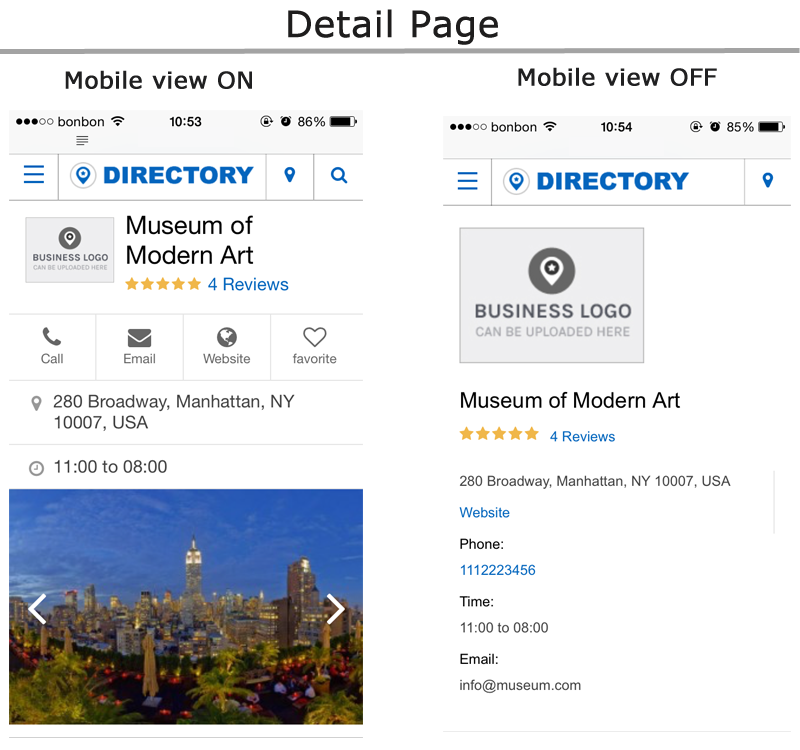
Design Settings
To open this section navigate to wp-admin ⇨ Appearance ⇨ Customize. From this section you can make design-related changes to Directory. Here are the options available…
Site logo
For instructions regarding the logo click here.
Navigation
Choose which menu displays in which menu area. It’s better to control these things from Appearance ⇨ Menus.
Color settings
Set different colors for different areas of the theme. Please note that specific city colors can override the global background you set in this area.
For making more extensive design tweaks use the Appearance ⇨ Custom CSS Editor area. To learn more about making CSS changes open this video.
Background settings
Set a background image by clicking on the “No image” grey box and then on “select a file”. Select a file on your hard drive and click “Open”. Control the look of your background image by tweaking the repeat property, position and scrolling.
Please note that specific city backgrounds can override the global background you set in this area.
Static Front Page
Directory will assign the correct Home page during activation. Don’t change these settings unless you know what you’re doing.
Footer
This box controls the bottom right corner of your site (the credits). Feel free to remove the “Designed by Templatic” part if you want.
Miscellaneous features and actions
Create pages using page templates?
Available templates
Directory comes with below mentioned built in Page Templates.
- Archive Page – shows the posts month wise.
- Contact Us Page – shows a contact form. To create a Contact Us page select the Contact Us page template and go to Appearance ⇨ Widgets. Place the “T – Contact Us” widget inside the “Contact Page – Main Content” widget area. Inquires sent using such form goes to the email address specified in wp-admin ⇨ Settings ⇨ General. If you’re looking to customize the contact page, the relevant code is located inside the \wp-content\themes\Directory\page-templates\contact-us.php file.
- Front Page – creates a static Home Page. Click here for more info about setting up the homepage.
- Full width – makes your page full width (removes the sidebar).
Utilizing page templates
Just follow these steps…
- Create a new page from wp-admin ⇨ Pages ⇨ Add New
- Select any page template from the Template option given in Page Attributes section on the right side of your screen and publish it.
Theme Widgets
- T – Advanced Search – Simply select the post type in it (like listing, events etc) for which you want to show advance search and save it. You can show any custom field in the advance search form by checking the “Advanced Search” box inside the “Show the field in” option while creating the custom field from wp-admin ⇨ Tevolution ⇨ Custom Fields.
- T – All Categories List – Show categories and their sub-categories. Use in the Homeage – Main Content area.
- T – Browse By Categories/Tags – Shows a list of list of categories or tags for the selected post type
- T – Category Page Map – The widget allows you to display a map on category pages. Comes in two variants (single-city and multi-city). They’ll show depending on whether or not you have the Location Manager plugin enabled. To use it make sure that “Map View” is disabled in Tevolution ⇨ Settings ⇨ Category Page.
- T – Contact Us – Shows a simple contact form that your visitors can use to get in touch with you. Emails will be sent to the address entered in wp-admin ⇨ Settings ⇨ General. To create a better contact form I recommend using the Contact Form 7 plugin.
- T – City DropDown – The widget will display the same cities as the header city selector, i.e. the ones you create in Tevolution ⇨ Manage Locations ⇨ Cities (tab). You should use it only once in a page to let it work accurately.
- T – Detail Page Map – Use inside detail pages of any post type. It shows a map based on the address and map view entered for that particular listing. Works best inside sidebar areas.
- T – Display Authors – Lists the authors on your site. You can choose the author role from the drop down given in the widget. Works best in sidebar areas.
- T – Display Posts – Show posts from any post type with post thumbnail, post title, post content, etc. Works in both sidebar and main content areas.
- T – Facebook Like Box – Shows a box with resizable style helpful to show Facebook fans on your site.
- T – Flickr Photos – Shows photos from Flickr on your site. Enter the title for your widget, the Flickr ID, number of images to display and you’re done. Get your Flickr ID here.
- T – Google Map Location – A simple widget that shows you a map of the address entered in it. You can use it on your contact us page.
- T – Homepage Display Posts – It will show your featured posts of any custom post like events, listing etc on your home page. Featured posts will be displayed above ordinary posts.
- T – Homepage Map – Comes in two variants (single-city and multi-city) depending on whether or not the Location Manager plugin is active. Click here for more info about the homepage map.
- T – Homepage Banner – It displays a slider for selected post type or custom images that you set in the widget. Click here for more info about this widget.
- T – Instant Search – Allows visitors to search through different types of content and also different areas (listing titles, categories, custom fields, etc). It has the ability to display relevant results as soon as you start typing.
- T – In The Neighborhood – Displays listings that are in the vicinity of the listing that’s currently displayed. Use this inside the “Listing Detail Page Sidebar” widget area.
- T – Login Box – It shows “Login” and “Registration” links prior to login and after user logs in, it shows their profile dashboard links. Use this in sidebar areas.
- T – Newsletter – Shows a subscribe box with which users can subscribe your newsletter. Some of the suitable areas are Homepage – Main Content, Footer and any sidebar area.
- T – Popular Posts – It lists the popular post as per total views, daily views or comments.
- T – Recent Reviews – Shows the latest commented listing from any post type available on the site.
- T – Search by Miles Range – Allows visitors to enter an address and a mile range. This will create a perimeter from which listings are then pulled. Use this inside the “Listing Category Page Sidebar” area.
- T – Social Media – Provides a link to your account on various social media sites. Some of the suitable widget areas are Sidebar areas, subsidiary areas etc. Click here for more info.
- T – Testimonials – Allows you to display testimonial sentences on your site with a matching text and link. You can also set animation to it using the fields like “Set Time Out”, “Set the speed” and “Transition type”.
- T – Twitter Feed – Helpful to show your latest tweets from Twitter. Read our detailed tutorial for more info on using this widget.
How to translate Directory?
Directory can be translated using Poedit software. Detailed instructions for that are available inside our localization tutorial. Please read that article.
Here are some things that are specific to Directory and thus not explained inside the localization article…
Directory has a global PO file
The global PO file contains strings from all 4 main components. Each of the components (1 theme, 3 plugins) also has its own PO file with strings only from that component. I highly recommend using the global PO file for translating since it’s much easier to manage 1 file instead of 4 separate ones.
The location of the global PO file is: /wp-content/themes/Directory/languages/en_US.po
Every Directory child theme has its own global PO file. If you’re using a child theme like SpotFinder, don’t translate the parent theme’s PO file, use the PO file available inside the child theme’s folder.
For SpotFinder that path would be: /wp-content/themes/SpotFinder/languages/en_US.po
Directory has separate front-end and back-end strings
The global en_US.po file mentioned earlier contains front-end strings. If you want to translate the back-end area use the admin-en_US.po file. This is a global back-end PO file which contains strings from all 4 main components.
The location of the global back-end PO file is: /wp-content/themes/Directory/languages/admin-en_US.po
Translating add-ons
Text strings from add-ons aren’t included inside the global PO file. To translate an add-on you will need to translate its specific PO file. Each Directory add-on has a languages folder which contains a en_US.po file with text strings from that add-on. For example, here’s a path to the PO file for the Fields Monetization add-on:
/wp-content/plugins/Tevolution-FieldsMonetization/languages/en_US.po
Translating Directory in multiple languages
Let’s assume you want to translate Directory in German and Italian. If you followed the instructions inside the translation article correctly you should now have these two MO files: de_DE.mo and it_IT.mo. These files (along with their PO counterparts) should be located inside the /Directory/languages folder.
Follow these steps to complete the process…
- Connect to your server and open the /wp-content directory.
- Inside wp-content create a new folder called languages.
- Paste your MO files inside this folder. In our case, those are de_DE.mo and it_IT.mo
- By creating the languages folder we added a new setting inside WordPress. Go to wp-admin ⇨ Settings ⇨ General ⇨ Site Langauge. Use this option to switch between your languages; in our case Italian and German.
- When you’ll need to make translation changes do not update files inside the /wp-content/languages folder. Update them inside the /wp-content/themes/Directory/languages folder.
Performing the above steps won’t allow you to display Directory in 2 langauges at the same time (i.e. allow visitors to choose the language). To achieve that you will need to purchase and install the WPML plugin.
Third-party plugin compatibility
WooCommerce
With WooCommerce you can transform your site into an online store. WooCommerce will handle all your products, shipping, tax and more.
To install the plugin navigate to Plugins ⇨ Add New and search for “WooCommerce”. Install and activate the first plugin in the results. For more details on how to actually use the plugin open the WooCommerce Docs.
Other supported plugins
- WordPress SEO by Yoast – by far the best SEO plugin inside the WordPress plugins directory. Since Directory doesn’t come with SEO features built-in it’s highly recommended you install a plugin such as WP SEO by Yoast.
- Gravity Forms – Gravity Forms is a premium plugin, but definitely worth it. It allows you to setup everything from simple contact forms to extensive and powerful order forms.
- Google Analytics Dashboard – helpful to keep track record of your site statistics that includes number of visits, number of visitors, bounce rates, organic searches, pages per visit directly on your Admin Dashboard. Templatic’s directory add-on “Admin Dashboard” may also help you with further features.
- Comment Images – with the help of this plugin you can let your users upload their image right on the comment form.
- Simple Google Static Map – show a static Google map of a particular city
Style text with shortcodes
The easiest way to add buttons or columns into a post or page is to use shortcodes. You will find details on how to install and use them inside our Shortcodes article.
How to customize Directory?
You should avoid editing theme files directly at all cost. Instead, use a child theme or (even better), a plugin for PHP tweaks. CSS changes should be added to Appearance ⇨ Custom CSS Editor.
Open the Directory Customization article for details on how to customize this theme.
Optional features (free extensions)
To streamline the plugin as much as possible certain features are available as optional (free) extensions. Download links for each feature are provided below.
Bulk Import/Export
Bulk Import allows you to populate the site with a lot of content in a short amount of time. If you already have a lot of content, this feature also allows you to export it. Both import and export work with CSV files. Import and export is available for both the actual content (events, properties, posts) and cities (controlled by the Location Manager add-on)
Installing the extension
- Download the Bulk Import/Export extension.
- Navigate to Plugins ⇨ Add New ⇨ Upload and load the downloaded zip file. Activate the plugin once the installation is complete.
- To start using the plugin navigate to Tevolution ⇨ Bulk Import/Export.
How to edit a CSV file?
Using CSV files you’ll be able to upload up to 10,000 posts at once. To get started use the sample files provided in Tevolution ⇨ Bulk Import/Export as a base for your own CSV. A CSV is basically a simple text file. You can use any text editor to edit it; even something like Notepad++ would work in theory. Only in theory because editing a CSV as a plain text file is extremely hard and generally not recommended. Instead, you should use either OpenOffice Calc or Microsoft Office Excel. We’ve explained how to use both in the sections below.
OpenOffice Calc
OpenOffice is a free alternative to Microsoft’s Office suite, and Calc is an alternative to Excel. You can download it from here.
Assuming you have Calc installed and a sample file downloaded, follow these steps to get started:
- Open Calc and click on File ⇨ Open (or hit CTRL + O on your keyboard)
- Locate the sample CSV file on your hard drive and click Open
- In the popup that appears you should now see 4 sections of options: Import, Separator options, Other options and Fields
- Set the values for the “Import” section like this
Character set: Unicode (UTF-8)
Language: English (USA)
From row: 1 - Inside the “Separator options” section choose the “Separated by” option and then select “Comma”. Uncheck other boxes if they are selected by default.
- In “Other options” leave everything unchecked
- In the “Fields” section left mouse click on the first field and then drag the horizontal slider to the right (to the end). Now press and hold the SHIFT key and click on the last field. All fields should now be selected.
- With the fields selected choose “Text” under the Column type option
- Click OK in the top right corner to start editing the CSV
- Once you’re done with adding data save the file by going to File ⇨ Save or by hitting CTRL + S on the keyboard
Not adding data in English? To avoid encoding issues and missing characters, you must save the file in the encoding appropriate for your language. To do that go to File ⇨ Save As…, at the bottom of the popup you should see a “Edit filter settings” checkbox. Click on it and then hit Save. A popup should now appear in which you need to select the character set (leave the rest as is). Choose the appropriate encoding and hit OK. Do not choose UTF-8. UTF-8 encoded files created with Calc do not work correctly in Directory. No such problem with UTF-8 CSVs created with Excel.
Here’s a list of a few popular encodings
- Western Europe (ISO-8859-15/EURO – includes German, Swedish, Spanish, Italian, and more
- Eastern Europe (Windows-1250/WinLatin2) – includes Polish, Slovak, Croatian, Serbian (latin) and more
- Cyrillic (ISO-8859-5) – includes Bulgarian, Belarusian, Russian, Serbian and Macedonian
You can also use Google to determine the character encoding for your language. Just search for “character set for [your_language]”.
Microsoft Office Excel
Unlike Calc, Excel can create UTF-8 encoded CSV files just fine. Some languages are only supported by UTF-8 (like Hindi), making Excel the only viable option for editing the CSV.
- Assuming you’re Windows, go the Control Panel ⇨ Clock, Language and Region ⇨ Region and language (or just search for “Region and language” using the start menu). In the “Region and language” popup click on “Additional settings” in the bottom right corner. Set the “List separator” to a comma [ , ].
- Open a new Excel spreadsheet and click on Data in the top navigation bar. After that click on “From Text”.
- Locate the sample CSV file on your hard drive and click Open.
- Select the “Delimited” option and set the File origin to Unicode (UTF-8). Click on Next.
- Uncheck “Tab” and select “Comma” as the delimiter. You should see a change in the data preview below. Click on Next.
- Under data preview, left mouse click on the first field and then drag the horizontal slider to the right (to the end). Now press and hold the SHIFT key and click on the last field. All fields should now be selected.
- With the fields selected, choose “Text” as the column data format in the top left corner of the popup. Click on Finish to complete the process.
- Click on Ok to import the data into the existing worksheet. Start adding your content.
- Once you’re done with adding data save the file by clicking on the office icon and choosing “Save As”. Under “Save as type” select “CSV (Comma delimited”. You’ll likely see some warnings after saving – select Yes for everything.
Additional info about specific CSV columns
templatic_post_author
The ID of the author. You can get this info by hover over the user in wp-admin ⇨ Users (similar to how you obtain post IDs).
templatic_post_name
The URL slug of the listing. Example: this-is-a-URL-slug
featured_type
This field accepts 4 possible values: none, both, h, c.
none – the listing isn’t featured
both – listing is featured on category page and homepage
h – listing is featured on the homepage
c – listing is featured on the category page
templatic_img
Inside this field you should enter the image filename. If you have multiple images separate them with semicolons. Example: music.png;cooldude.jpg;thirdimage.jpeg.
After the bulk upload you need to transfer those images to /wp-content/uploads/bulk (create the bulk folder if it’s not already created).
listing_logo
Enter the full URL to the logo image. You can upload the images from wp-admin ⇨ Media ⇨ Add New.
alive_days
Number of days the listing will be active on the site. Once that time expires the listing will be trashed or drafted. The exact action depends on your selection in Tevolution ⇨ Settings ⇨ Submission page ⇨ Default status for expired listings.
templatic_post_status
Set to publish or draft, depending on whether or not you want the listings to be available right after submission.
General tips for adding data
CSV files require a specific structure in order to work. Because of that peculiar structure they can often be tricky to edit. Here are some of the tips that should help you make the process a bit less time-consuming.
- In our sample CSV a comma [ , ] is used for the separator. Do not change it to another symbol
- When you need to enter a comma as a value (instead of a separator), wrap the whole value in quotation marks [” “]. For instance, if you need to enter multiple categories, enter them like this “Category1,Category2,Category3”
- Separate images with a semicolon [ ; ]. Example: img1.png;img2.jpg;img3.gif (commas aren’t necessary in this case)
- HTML is allowed in CSV files, feel free to use it. However, be aware of quotes. When writing HTML you must use quotes for most tags (including anchor and image). To avoid problems with the CSV, make sure to escape every quote. You do this by doubling up on quotes.
For example, instead of this: This is a link
Enter this: This is a link - Inline CSS is also allowed, just make sure to escape quotes as mentioned for HTML
- Enter dates and time in the ISO format ⇨ YYYY-MM-DD hh:mm. For example, the 2013. Christmas day at 3pm in this format would be: 2013-12-25 15:00
Bulk Export
To export your content into a CSV file choose the post type of the listings you want to export (in the CSV Export section) and click on the blue “Export To CSV” button.
How is it helpful?
Bulk Export can be helpful for…
- Taking regular backups of all your records.
- Transferring content to a different site.
- Lending/selling your data to someone.
Website crashing while exporting listings?
This can happen when exporting a large number of listings (over 1000). You can fix the problem by increasing the memory available to WordPress. Do that by adding the following code to your wp-config.php file.
define('WP_MEMORY_LIMIT', '512M');
IP Blocker
This extension will allow you to block specific IP addresses from your site and also implement SSL for the registration and submission pages.
Installing the extension
- Download the IP Blocker extension.
- Navigate to Plugins ⇨ Add New ⇨ Upload and load the downloaded zip file. Activate the plugin once the installation is complete.
- To start using the plugin navigate to Tevolution ⇨ Settings ⇨ Security Settings (tab).
Coupon Manager
Installing this extension will allow you to create discounts for your own price packages. This is great when running promotions (like for Christmas or Black Friday).
Installing the extension
- Download the Coupon Manager extension.
- Navigate to Plugins ⇨ Add New ⇨ Upload and load the downloaded zip file. Activate the plugin once the installation is complete.
- To start using the plugin navigate to Tevolution ⇨ Monetization ⇨ Manage Coupons (tab).
By creating coupons you can offer discounts on your own price packages. This is great when running promotions (like for Christmas or Black Friday). To create a coupon go to Tevolution ⇨ Monetization ⇨ Manage Coupons ⇨ Add a new coupon. Coupons can be limited to a specific time-frame by setting a start and end date. If you want the coupon to never expire, just enter an end date well into the future.
On submit pages the coupon code field will show automatically inside the last (Payment) step

Extend the functionality
Even though Directory comes with a crazy amount of features built-in there is even more stuff you can add by purchasing premium add-ons. Some of the most popular add-ons at the moment include…
- Fields Monetization – add more variety to your price packages by controlling which fields show up for which price package.
- Events – enables a new post type inside your theme; events. Recurring events functionality is also available with this plugin.
- List Filter – add custom fields as new filters for the listing category pages. Also works on search results pages.
- Tabs Manager – allows you to display existing or new custom fields as tabs on the listing detail page.
- Category Icons – display a nice Front Awesome icon every time categories are listed. Works with category widgets and sub-categories within parent category pages.
Cross browser compatible
The directory WordPress theme is an attractive, responsive ad cross browser compatible theme that renders the same consistent view in all the browsers.
The directory theme is compatible with all of the most popular browsers like Chrome, Opera, Safari, and the latest two versions of the Internet Explorer.
Why is it important?
The fact that all the visitors use different browsers to reach your website makes it mandatory for a successful website to be cross-browser compatible. If the website does not render well in all the browsers the users experience will suffer and they won’t be satisfied with the site.
Apart from being responsive, the site also needs to be cross browser compatible. The directory platform is very vast and there will be various visitors visiting it from different locations, using different browsers.
Use
If your website is not cross-browser compatible the visitors will be unable to perform certain actions or will face several other display issues. This can be a clear sign of inefficiency of the website.
The inconsistent view of the website on different browsers might lead the users to think that the website is non-functional or not working properly. They might even quit visiting the site anymore. Therefore cross-browser compatiblity is very important for a website.
Frequently Asked Questions
To speed up your Directory-powered website you should look into speeding up WordPress in general. Instructions on how to do that have been provided in this article
https://templatic.com/docs/how-to-speed-up-your-website/
How to make the site more secure?
We highly recommend reading the following Codex article on WordPress security. It applies to all WordPress themes and sites, including your Directory site
http://codex.wordpress.org/Hardening_WordPress
How to make a specific listing featured?
To feature a listing you first need a price package in which the featured options have been enabled. Follow these steps to complete the process…
- Assuming you don’t have any price packages with featured options, navigate to Tevolution ⇨ Monetization and click on the “Add New Package” button.
- Under “Featured Options” near the bottom of the form click on the “Homepage” and/or “Category Page” options.
- Enter the featured price for the homepage/category page and the duration in case you want the featured time to be different than the overall duration of the price package.
- With all that done, open a listing on your site (in the back-end) and scroll down to the bottom of the edit page.
- Under the “Price Packages” section you should now see your new price package. Click “Select” to select the package.
- Once you do that featured options should appear below the price packages. Click on those checkboxes to make the listing featured.
- Save the listing to finish the process.
How to enable social login through Facebook, Twitter, etc?
Social login can be controlled from Tevolution ⇨ Settings ⇨ Registration page ⇨ Allow user to login from social sites. For details on how to create Facebook, Twitter or Google+ apps click here.
How to remove the “Select All” option when selecting categories on the “Submit Listing” page?
To remove that option just add the following snippet of code to Appearance ⇨ Custom CSS Editor
.cf_checkbox > label {
    height: 0;
    visibility: hidden;
}
How to configure SEO settings?
Directory theme doesn’t come with SEO features built-in. Instead, we are providing full support for these two popular SEO plugins
How to hide the city selector?
If you want to use Directory with multiple cities, but don’t want to display the header city selector, just enter the following code to Appearance ⇨ Custom CSS Editor.
body .toggle_handler {
display: none;
}
#show_togglebox-button #show_togglebox_wrap {
display: none;
}
Why aren’t changes to my custom fields showing?
By default the theme will cache custom fields. To disable caching go to Tevolution ⇨ Custom Fields and click on the “Disable Cache” button at the top of the page.
Can authors upgrade their listings to a more expensive price package?
Yes, they can. An option for upgrading a listing is available inside the user dashboard. It will display as long as the listing is still active. Once it expires the “Upgrade” button will be replaced with a “Renew” button.
How to remove the WordPress admin toolbar?
The easiest way to achieve this is by using a plugin. Follow these steps…
- Navigate to wp-admin ⇨ Plugins ⇨ Add New and search for Admin Bar Disabler. Install and activate the first plugin within those search results.
- With the plugin installed navigate to wp-admin ⇨ Settings ⇨ Admin Bar Disabler and choose for which usergroups you want to show or hide the admin bar.
How to enable infinite scrolling?
- Install and activate the Infinite-Scroll plugin.
- With the plugin active go to Settings ⇨ Infinite Scroll.
- Enter the following under the Content Selector option
#loop_listing_taxonomy,#loop_listing_archive,#tmpl-search-results
- Enter the following under the Navigation Selector option
.pagination
- Enter the following under the Next Selector option
.next
- Leave the rest as-is and click on “Save Options”.
With this completed infinite scrolling should now be enabled in all category pages, the “all listings” page and also all search pages.
How to create a contact form?
- Go to Pages ⇨ Add New and create a page using the “Contact Us” page template.
- Go to Appearance ⇨ Widgets and insert the “T – Contact Us” widget inside the “Contact Page – Main Content” widget area.
Messages submitted using the contact form will go to the email address specified in Settings ⇨ General.
Why aren’t blogs displaying on the front end?
- If location manager is enabled for post type Post and you have not selected city for the particular post then it will not display on the front end.
- If you will select a city on Location & Map settings for that particular post then it will work properly.
- If you don’t want to enable location management for blogs then simply disable it from Dashboard>> Tevolution >> manage locations>> uncheck the post from enable location management for and save it.
Site loads blank frequently(for GoDaddy users)?*
GoDaddy users sometimes have problem that their site loads blank frequently after each 4-5 pages. Try updating PHP version on the site. You can update the PHP version from your GoDaddy cPanel itself or you may ask GoDaddy support too.
How to use WP REST API in Directory and child themes?
Find answer of this in more details here – https://templatic.com/docs/how-to-use-wp-rest-api-in-directory-and-child-themes/
WPML
Precautions required while translating individual custom fields in multiple languages using WPML.
If you have configured your WPML plugin content correctly, you should able to see the + sign next to each individual custom fields at your wp-admin ⇨ Tevolution ⇨ Custom field module.
See https://drive.google.com/file/d/0B4zqYzsurbeFZjhxTFNZWUozd3M/view
Click Upon that + sign for the required custom field you need to translate.
Take care of the following points while translating custom fields using WPML:
- During the translation process, do not change the HTML variable name for any custom field. Keep it identical as of your default language.
- Also do not change rest of the settings including Validation Options, Display Options, Miscellaneous Options etc..
- If any of your custom field is holding a field type as Multi select or radio, then do not change a value for the field “Option values”. Instead you can modify value for the field “option title”.
- You can change the content for Label, description, and default value fields.
Directory Resources
We have an “all-in-one resource page” that will assist you to set up your Directory site. This page contains all the resources and information that you will possibly need while setting up the website. Click here to go to the resources page.
How to uncheck categories by default?
Please access to your server file path wp-content\plugins\Tevolution\tmplconnector\shortcodes filename shortcode_taxonomies_map.php around line 211 and you will find some code where you need to search checked=”checked” from 2 locations and make changes as per your needs.
How to set the maximum number of map pins?
Please access to your server file path wp-content\plugins\Tevolution\tmplconnector\shortcodes filename shortcode-init.php search the code posts_per_page and change the -1 to the number that you need to show the map pins on your directory or any child themes.