Want to start events portal and start earning online? Here are the seven simple steps from the setup to maintenance for you to get started.
The modern technologies have certainly made our lives easier. Whether it is booking an airline ticket, or creating a website, you have the power at your finger tips.
If you are looking forward to creating an online events directory, you can use the WordPress Eventum theme by templatic and setup your events portal in minutes.
In this tutorial, I will explain the seven simple steps to successfully run your events website.
We will be using WordPress for building your events portal. It is ideal for beginners, affordable and every easy to use and manage. Here is Why we recommend using WordPress for Events website?
- Acquisition
- Installation
- Setup
- Customization
- Promotion
- Monetization
- Maintenance
Step 1: Acquisition: Get the Domain, Hosting and Theme
When you start a new business, you have to start with a little research as well as resource acquisition. It is the same with website building.
Since you are reading this guide, you must have already begun with the research. And then comes the resource acquisition part which is the first practical step towards website building.
The ‘resources’ needed to start an events directory are:
- Domain name for your website
- Hosting space
- WordPress Theme
- Extra WordPress Plugins (Optional)
Domain name and hosting for your events website is very important. The domain name of your website is the name is a very important decision for your events website because it represents your website on the internet, serves as it’s identity through which the visitors can find you.
Also, you need an efficient host to publish your website. The server space is renting the server where the web files and other data is stored. So whenever a visitor accesses your website, the server will fetch the required resources stored on it and present the visitor with the results.
For a successful website, you need to have an efficient host and a domain name that represents you correctly. Read this to find the best tips on finding domain name and a host for your WordPress events directory website.
Once we have the domain name and the hosting space, you can log in and start creating your website. Your host will most probably support WordPress to create your site. It will allow you to install the latest version of WordPress on your site and get started in minutes.
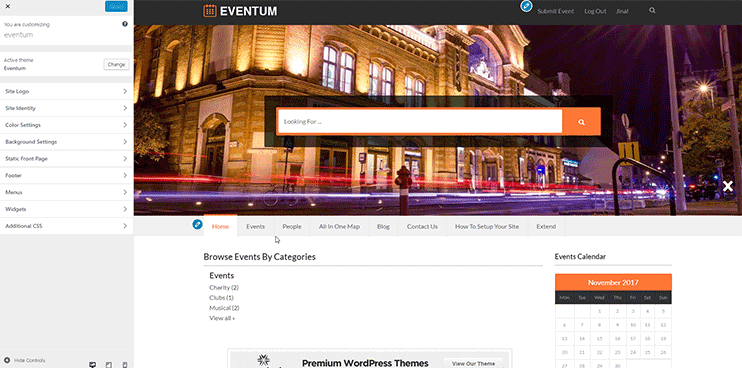
Eventum WordPress theme
Now, to start your website, you will also need a WordPress theme. Eventum is the theme we will be using to create a WordPress website.
The WordPress Eventum theme is an event directory website with design and features crafted to create an online events portal. It supports user registration & front end event submission to create a two way events portal – where the visitors can look for the events, and the event organizers can advertise their events.
So before you start – You should subscribe to the domain, host and download a theme to get started.
Besides that, you can add plugins to your website as and when required. Here are the basic plugins you should add to your Eventum based Event directory.
Step 2: Installation
At step 1, we talked about the pre-requisites to create your website. Your step 2 will be putting everything togather and start installing the components to create your site.
This step is a technical one, but don’t worry. With the efficient host and WordPress, you don’t actually require any technical expertise to perform it.
- Connect the domain name and hosting
- Install WordPress
- Install WordPress Theme (Eventum)
1. Setup Domain name for the host
There isn’t a fixed procedure to connect the domain name with the hosting account. But it’s always easy.
You can refer to a guide that your hosting service provider should provide you with – to help you allocate a domain name to the hosting account.
It will take just a minute or two to find the option within your control panel and associate the domain name with the host.
2. Install WordPress
If you have not subscribed to WordPress optimized hosting, you will have to start by installing WordPress. Mostly, all the hosts support one-click WordPress installation.
If by chance your host does not support WordPress auto-installation, you can download the latest version of WordPress from here, unzip it and upload using an FTP client.
Next, you can use PHPMyAdmin on your control panel to create a new database for your website. Note down the exact name of your database as you will be needing it again soon.
With WordPress uploaded/installed, you can access your website with the URL – www.yourdomainname.com/wp-admin, and setup your website with the help of instructions on your screen.
This will help you setup the Title for your website, connect with the database (where you need to enter the name of your database), set a username and password for WordPress admin access, etc.
The next step is to install the WordPress theme, which is really simple. All the advanced WordPress theme come with easy installation, that needs just a single click.
The installation steps for your WordPress theme will be mentioned in the theme guide.
Step 3: Customize your website
Creating a professional, attractive Event directory website is not a big deal. Thanks to Eventum Directory WP software, It helps to complete our 75% task in just a 30 minutes. Now what we need to do is to give it a touch of our imagination.
Change the Logo, Site title and footer Copyright Notice
Starting with primary customization like changing the logo, website color, and background. The logo reflects your brand and the color of your site reflect the personality of their Online Branding. The research said that the 60% of visitors attracts because of the website color. So use your wisdom to select the colors.
Restructure your Eventum site according to your requirements
The Eventum theme is created with widgets, So you can customize it rapidly. You may change the front end look according to festive season or feature the important evens.
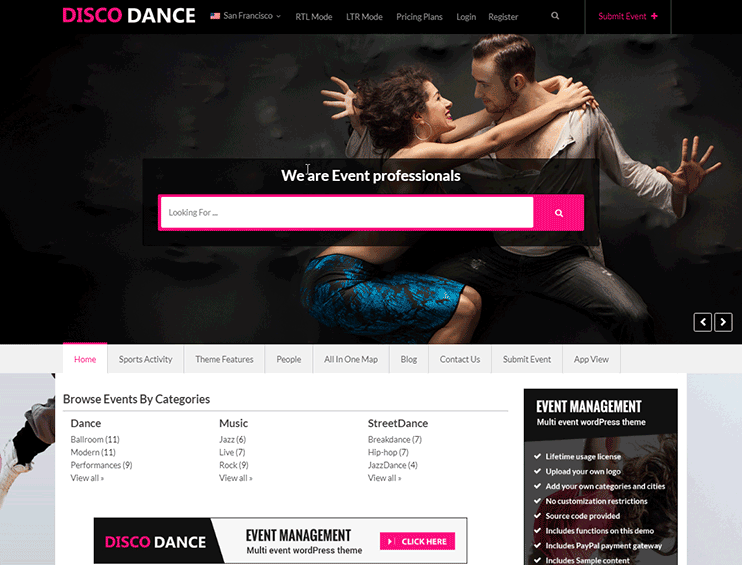
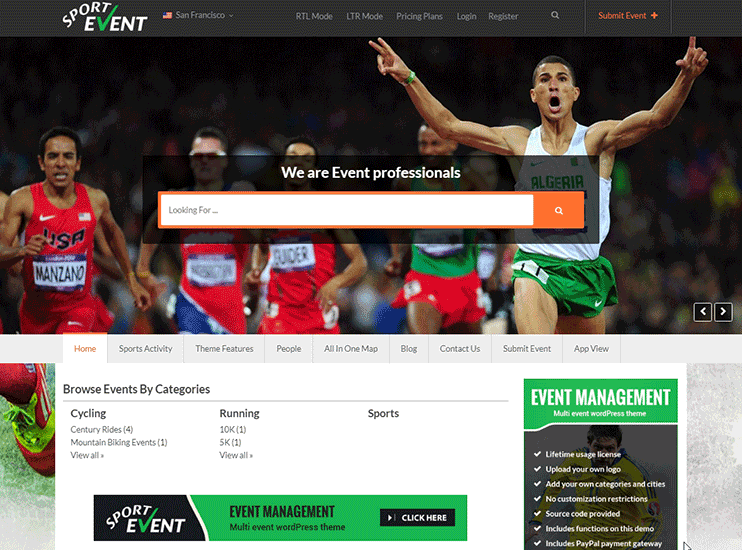
If you have created the events listing website for specific niche you may give it a look as follow.
Step 4: Initial Setup
You can use the different options available with the theme to make your website work and look just the way you want. What you can do with your website actually depends on the theme you choose.
Eventum comes with customization options enough to make certain
Offer Events submission on your Events Directory Portal
The directory provides a way to end users to advertise their own events. The directory owner can make money as they facilitate the event organizers to advertise their events or sell their tickets through your website.
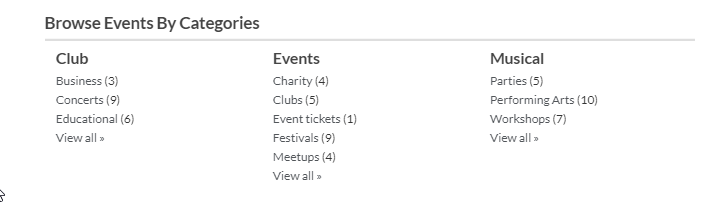
First of all, define your criteria. Add the categories for the events on your website. Display them on the menu so that it helps visitors find the events of their interest easily.
The Eventum event directory template displays these categories on the event submission page as well. So when an event organizer tries to submit his listing through your website, he can choose the category for his listing.
Additionally, The Eventum directory software lets you set a category price for submitting the events under different categories.
Add different required category according to the domain
Add Events listing in your Events directory script.
There are two ways of adding a listing on Evemtum portal.
- Adding Events listing by admin from the dashboard.
On the starting phase of your website, You need to add useful data to get into the market of advertising an event and reach to your audience. You can add the event listing from the backend of the site with all the required information. There is another way to importing a bulk event from Facebook with the help of addon. - Event listing submitted by visitors from the front end.
As discussed previously, The visitors can advertise their events on your site. Before submission events, it will display various price packages. Users can choose and list their event of your site for a specific period of time.
You can even import the relevant events from Facebook using a plugin to populate your event directory website with Event listings.
Create Pricing Options
Create packages with different facility according to price like how many listings are allowed, Categories allowed under the price package, Listing duration on the website. These packages will be displayed to the users when they try to submit the event so that they can choose the price package according to their need.
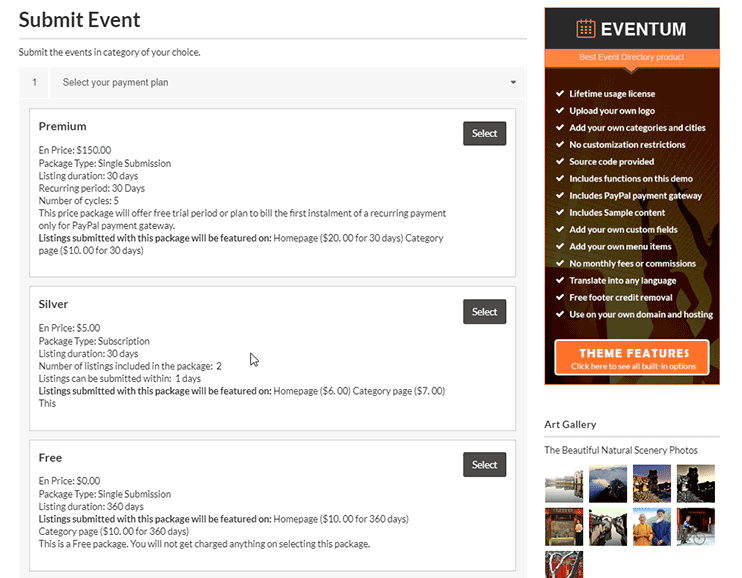
Allow paid/free event listing submission
At the beginning, to get more relevant data on your site I recommend to allow free event listing submission. As the time passes, the site will start generating traffic and there will be an enormous amount of event listings on your site. So over time, you can limit the event submission features for the free listing package.
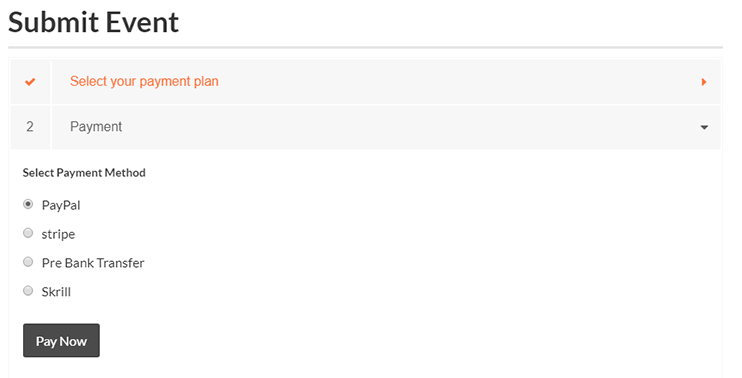
Payment Gateways
There are 15+ paid payment gateway add-ons for Directory are available. The payment gateways lets you smoothly accept payments for the events submitted on your site.
Also if you are planning to make global directory, you can accept payment for listing submissions through the popular payment gateways in different countries.
Step 5: Promotions
Once you get your website ready and running, it’s time to make sure that the site reaches the targeted audience.
With promotions you can make sure that your website is of use and earns you profit through it. There are different ways to promote your events website.
For different type of website, there are different promotional methods that work. Since an events portal is a directory website, generally any kind of promotional method will work.
The most common type of promotional method are:
- Advertising on different channels
- SEO optimization for organic ranking
- Social media marketing
Read: Best Way to Promote your Events website
Step 6: Monetization
There are several ways to make money with the Events directory script. Let’s check some useful ways for making money from external sources.
Ads Banner
Once you create the events advertising site, you will try to find the way to get make more money using alternatives like displaying banner advertisements. The Eventum Directory template comes with widgets that can easily let you insert static advertisement code or the Google AdSense code on your website.
So if you have sponsors ready to advertise on your website, the events directory script lets you earn in no time
Events Ticket Booking
We have very impressive addon. With the help of the Events, Ticket add-on users can sell tickets online for their events. If member wants to sell ticket for their event they can enable this option
The addon helps to sell your Event tickets online and earn money, furthermore, it allows your users to submit a ticket to your site. You can get a commission on selling the tickets for individual events.
The Ticket Transaction Report will show you all the transaction log of the purchased ticket through the website. through this section, Admin has the option to see the transaction logs of tickets.
The visitors can see the following button on events detail page from where they can buy the event’s ticket for particular events.
Membership Subscription
Membership plugin lets you restrict the visibility of the content on your site. That access you can allow only the paid members. That way upi can make money.
Field Monetization
Using this addon, you can get control over fields your users allowed to submit as per the price package. Check here for more information on Field Monetization.
Read: How to monetize your events website?
Step 7: Maintenance
The following routines that you must follow for regular maintenance of your WordPress events directory script are as follow.
- Managing the comments (marking spam, replying, deleting)
- Regular Backup of site
- Website Uptime Monitoring
These basic maintenance routines ensure that your website operates smoothly and efficiently.
Check the submitted Events
The Event Directory Software has the functionality to set the default submission as a Draft/Published, As we have set the default status for Free submissions as a Draft. The newly added events by end users will be in drafts. You need to verify each video and only publish it if you think it is appropriate.
Furthermore, It has the option to set the paid events submission default status, which we have set as a Published. because there are less to no chances for the paid users to add false or irrelevant data.
This way you can restrict the vulnerable content on your site and provide the end user with the useful and relevant content they are looking for.
Remove outdated events data from your website
If there are lots of events on your site, but that are outdated. Which are neither recurring no longer available, you can remove from your site.
Don’t worry you don’t need to find each and individual events by checking its occurrence. You can do it with a single click. by setting the default status for expired event listing as a draft or you can directly trash the expired events.
You can also send the reminder to event owner. It will send an email to the user whos events listing expires. So if they wish to renew or change the date the follow up may helpful.
Maintain Blog posts
The Events directory script has blogging functionality.
Blogs on your website give you the opportunity to create and publish the relevant content for site visitors. Furthermore, you can use this as a marketing tactic to drive more traffic to your website.
It improves the Website’s SEO Increase Traffic via inbound links. This way your an give your social followers a reason to click through to your website.
Conclusion
Creating Events Directory website using Eventum WordPress Directory Software which makes your site stand out from the crowd. Which providing an event listing facility to end-users and useful updates about events along with required information to visitors.
Further reading: