If you have created your WordPress site on localhost (your home computer or laptop) and want to publish it so that it is accessible to everyone (public) then keep reading. In this article we will explain how to move WordPress site from localhost to live server.
Before we start migrating the site to the live server we will explain why it is very good to run the site on localhost. There are many advantages, and we will single out the speed of editing and design changes, which is much faster than working directly on the server, your public site does not have to be down (if you do redesign locally), troubleshooting and implementing new options or improvements is much easier on localhost than on live server.
WordPress migration
Once your WordPress page is finished and you want to publish it, you’ve probably wondered how you’re going to do it. Migrating WordPress pages from one server to another sounds simpler, but it’s the same thing. The only difference is that the employees of the hosting company to which you are migrating your site will probably migrate from server to server. You must migrate from the localhost to the live server yourself.
Although it sounds complicated, this migration is very simple. There are two ways to do the migration, manually and using plugins. Below we will explain both ways to migrate WordPress pages from localhost to live server.
Manual migration of WordPress pages
Manual migration of WordPress pages is a bit more complicated than the method in which you use plugins. Nevertheless, we always opt for the manual method to make sure all the items we need to migrate are marked.
The first prerequisite to start the migration is to have a hosting account and a domain name. If you have previously purchased a hosting account and domain name then continue reading. If not, buy a hosting package. Be very careful when choosing a hosting package. Don’t buy cheap and unknown solutions. A good hosting provider is the most important part of a successful website and good business. There are many well-known hosting companies that offer hosting packages designed for WordPress sites. One of them is Bluehost. You can use any registrar to register a domain, and currently the most famous is GoDaddy.
Database export to move WordPress site from localhost to live server
The first step in manually migrating pages to a live server is database export. Almost all hosting providers offer cPanel in their services. Log in to cPanel, click “phpMyAdmin” within the “Databases” section.
After the new window opens, click on your database in the left menu, then click on “Export” in the top menu.
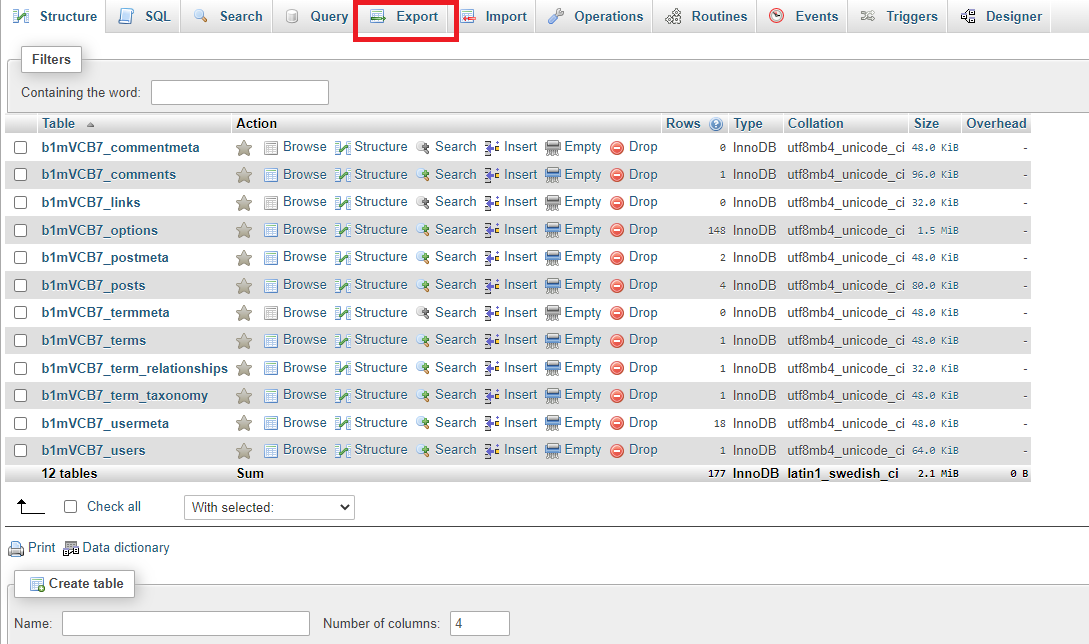
A new window will open offering you to adjust the export options. For this job we will choose “Custom” export because it offers more additional options.
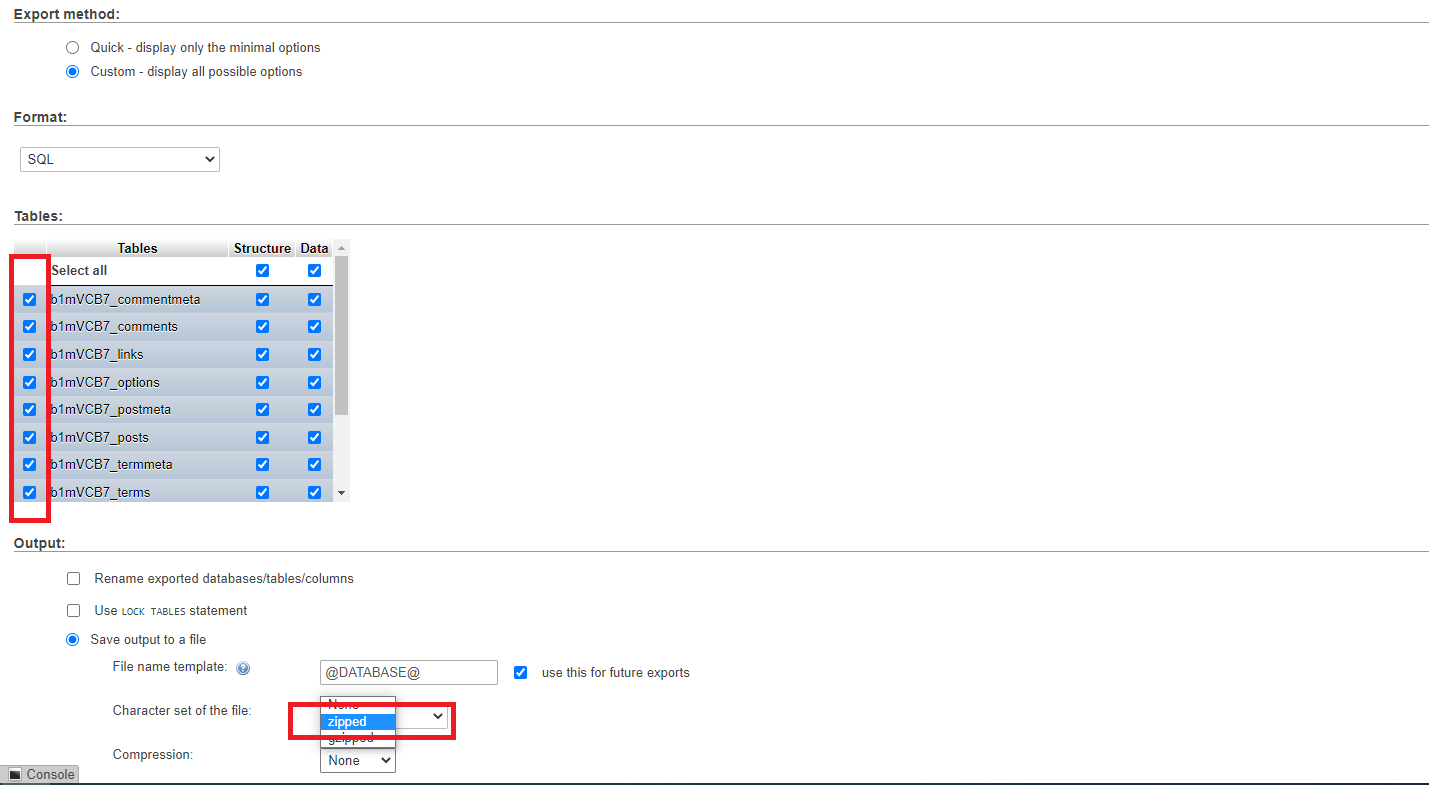
Click on “Custom export” and make sure all fields are selected. For the compression format, select .gzip just like the image below.
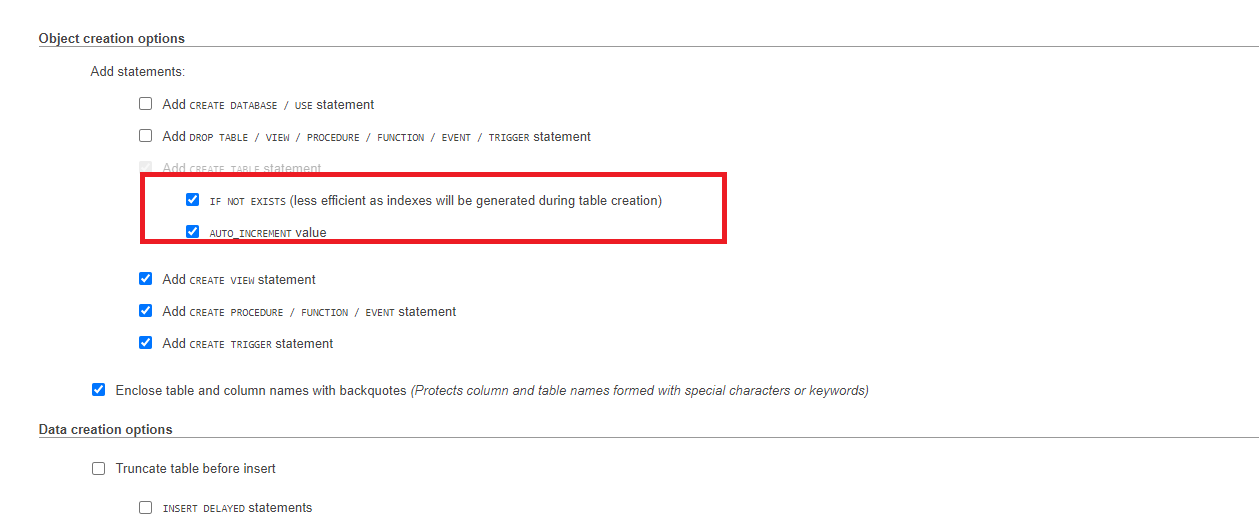
In the next step, be sure to select the “If not exists” and “Auto_increment” options.
Once you have selected the listed options click on the “Go” button to download the database in .gzip format to your PC.
Uploading site to the live server
The next step is to upload all the WordPress files to your live server. You will complete this step by using an FTP client, and we are using FileZilla which is a great and free FTP tool.
Select all the files from the WordPress installation folder on localhost and upload them to your live server in the public_html folder. The process of copying files to a live server can take a bit longer, and depends on the size of your WordPress site and the speed of your internet.
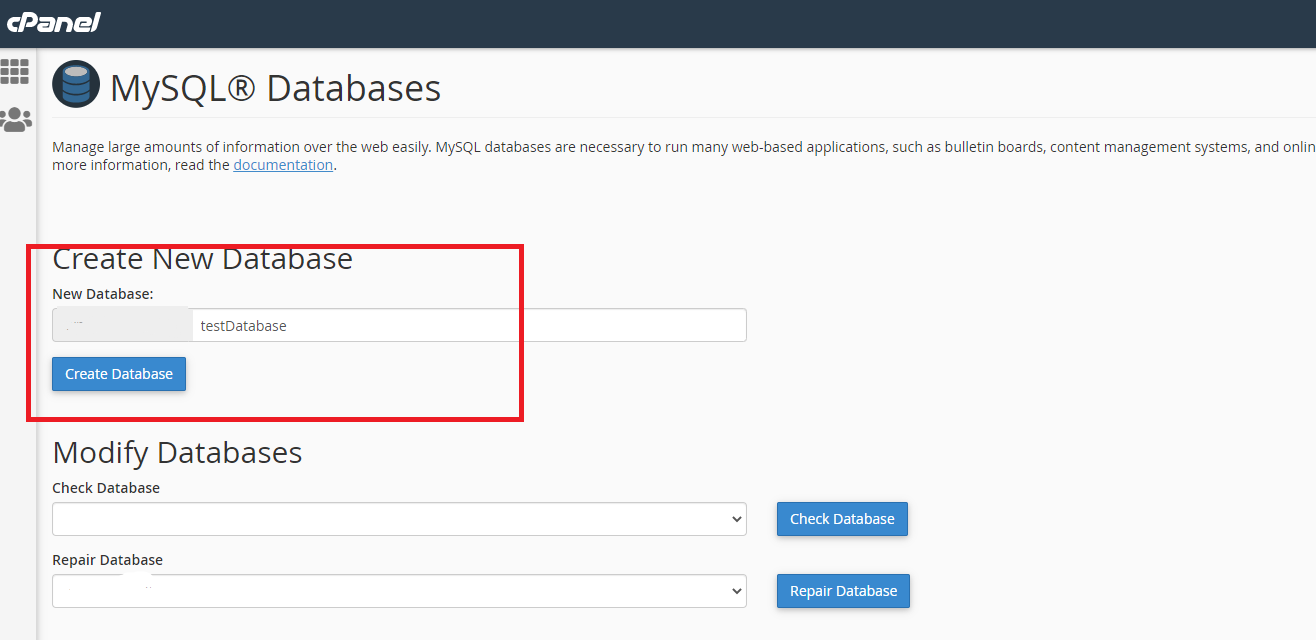
During the file transfer process we will create a new database on the live server. Go to cPanel and open the “MySQLDatabases” option.
Click on the “Create database” option.
Once you have created a database on your live site you need to create a user account that will have administrative authority to the database.
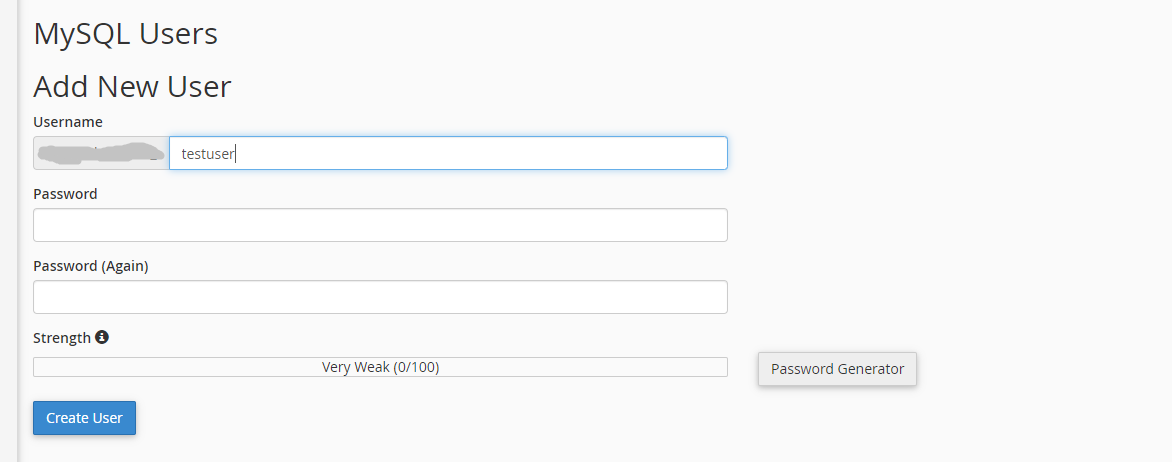
After creating the user, click on all the fields and assign all privileges to the newly created user.
If you have finished this step then most of the work has already been done, it still remains to upload your old database and that is it.
Importing the database
To complete this task visit cPanel again, click on “phpMyAdmin” and you will now click on “Import” in the top menu.
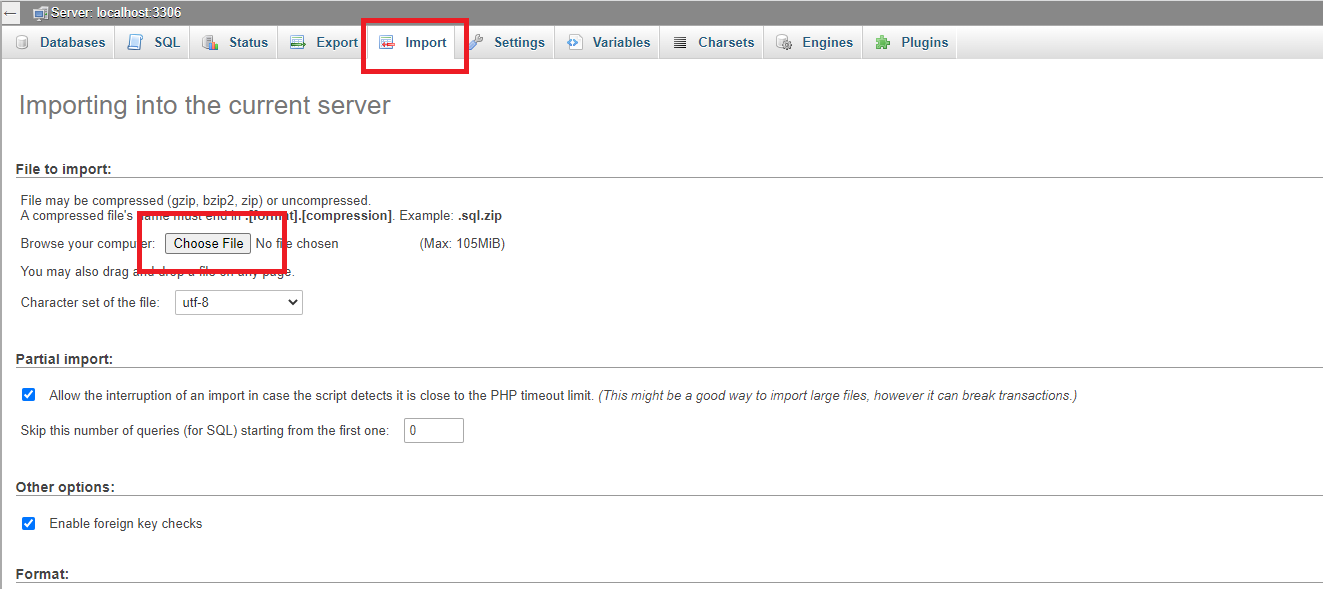
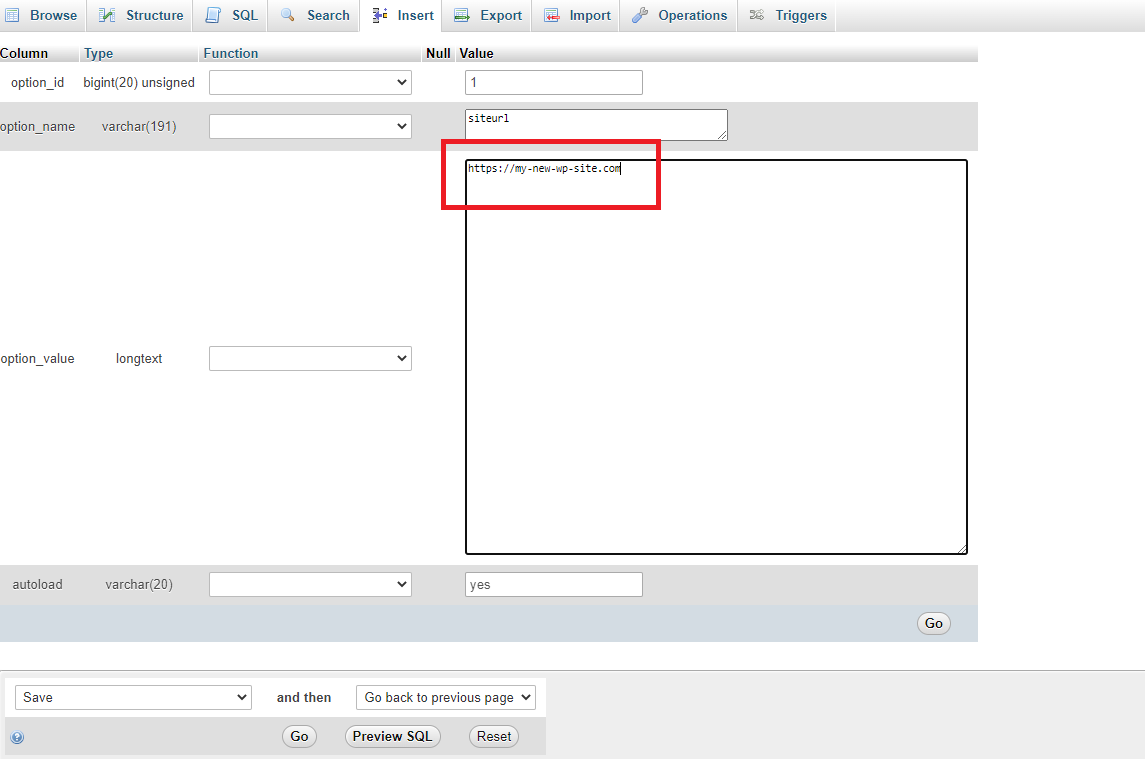
Database import can take time and depends on the size of your database. Once this process is complete, locate the “wp_options” option within the database, and click “Edit” inside “option_name”. Change your localhost name to the name of your new page. See the picture below.
The next step is to edit your wp-config.php file. Inside it you have to write the correct credentials for the database in order for everything to work properly. Open your FTP client, locate the wp-config.php file and click “Edit.”
The code lines that are important to us are:
define (‘DB_NAME’, ‘your_database_name’);
that defines the database name
define (‘DB_USER’, ‘your_database_user’);
which is the username for your database
define (‘DB_PASSWORD’, ‘your_database_password’);
That is the password of your database
define (‘DB_HOST’, ‘localhost’);
Enter the correct values in the specified fields – database name, database user, database password (you created them in the previous step within the “MySQLDatabases” option).
Save the changes and your job is done, the site has been successfully migrated to the live server. Visit www.yourdomainname.com and make sure everything works fine.
Migrate WordPress pages to a live server using a plugin
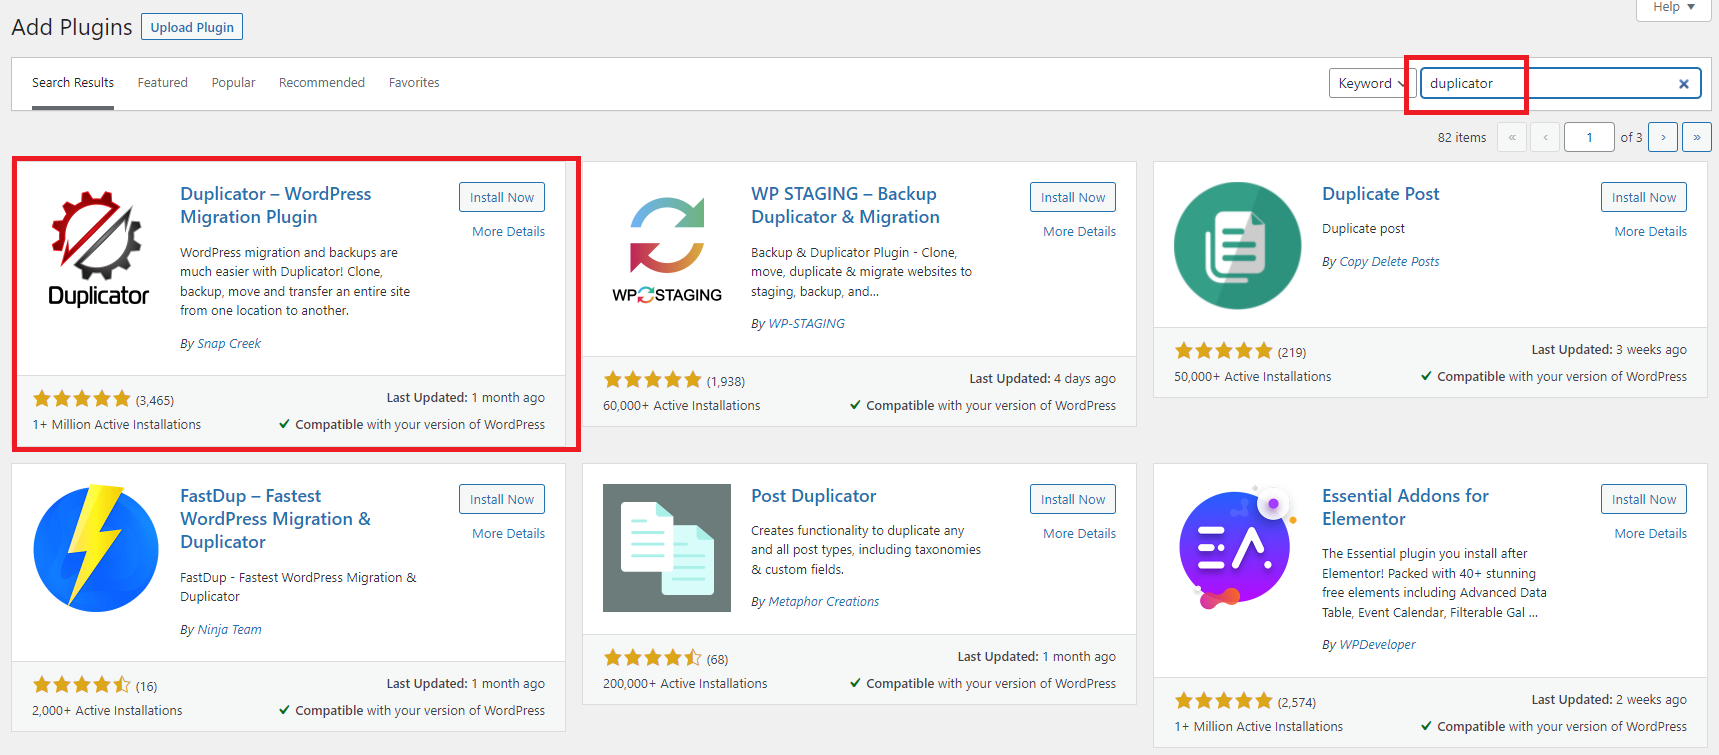
Although there are many plugins for site migration, we will use Duplicator for demonstration purposes. This is a great plugin that has over a million active installations and does a great job.
The first step is to install Duplicator on your localhost WordPress site. Click on “Plugins” then on “Add new” and type “Duplicator” in the search field.
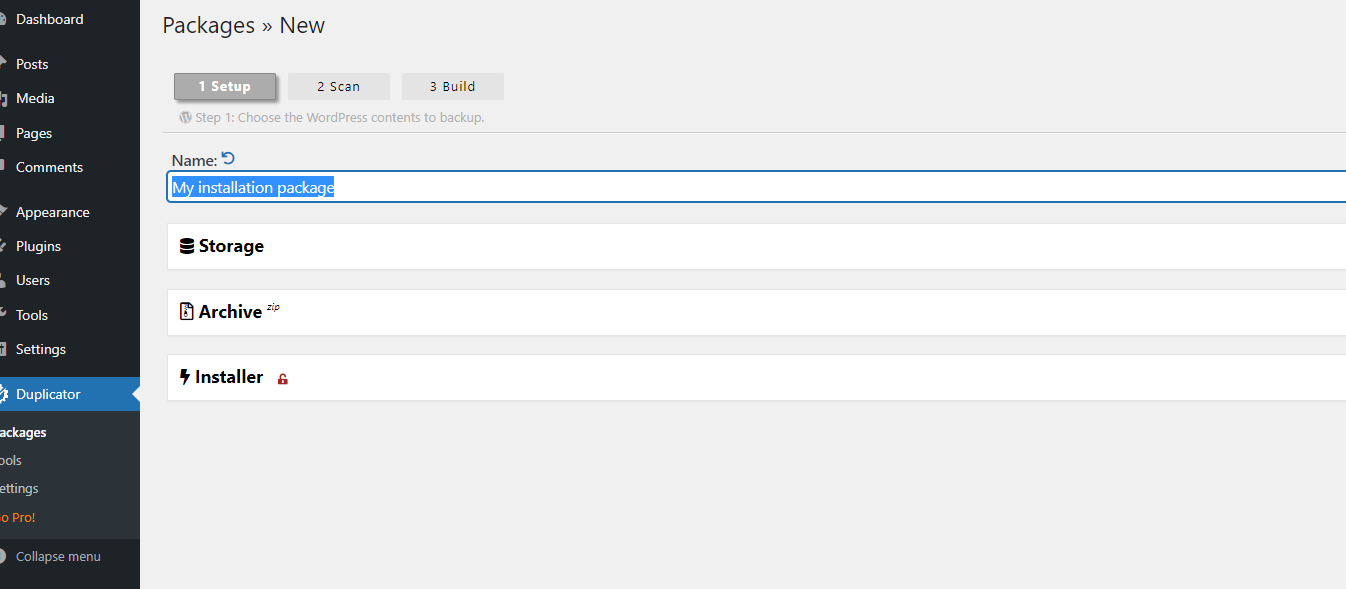
After installation, an additional “Duplicator” option will appear within the WordPress menu, and you will use it to complete work. Click this option and follow the instructions.
On the first screen you must define the name of the installation package. Enter a name and click “Next.”
Scanning your website
The second step is to scan your site. Here you will get information on whether everything is OK with your WP installation files and with the database.

Then click on “Build.”
When the creation process is complete, click on “Download both files.” You will get 2 files, one is a complete website and the other is an installation file that will be used to install localhost pages on a live server.
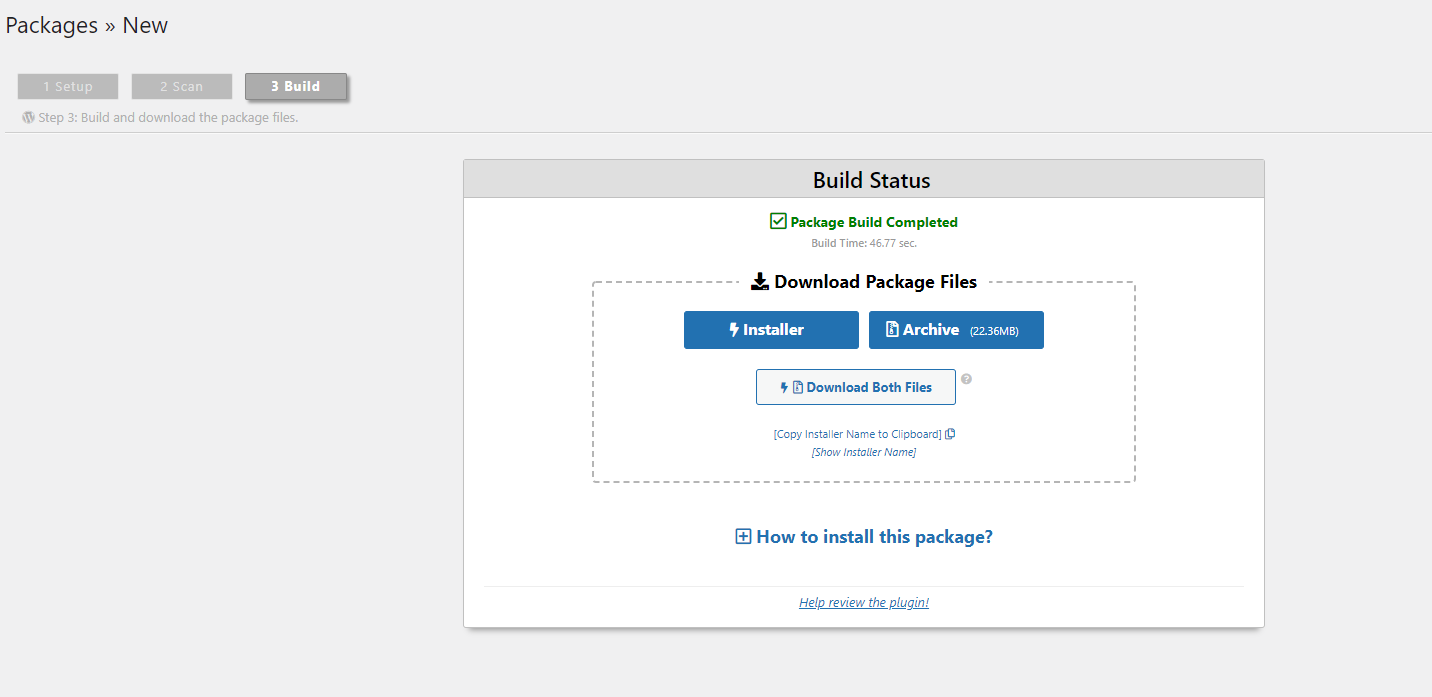
Now you need to open your FTP client. Go to the public_html folder on a live server and copy both files to that destination.
Installation of site
After both files have been copied, type yourdomainname.com/installer.php in the browser. This will start the installation of your site on the live server.
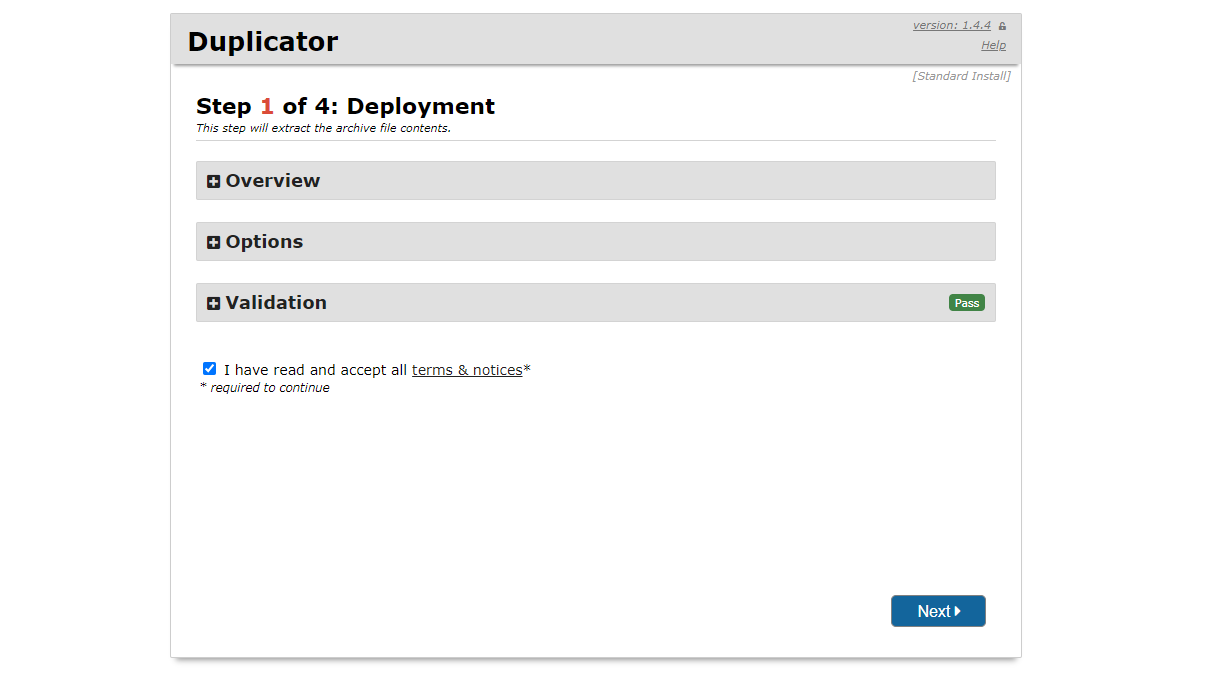
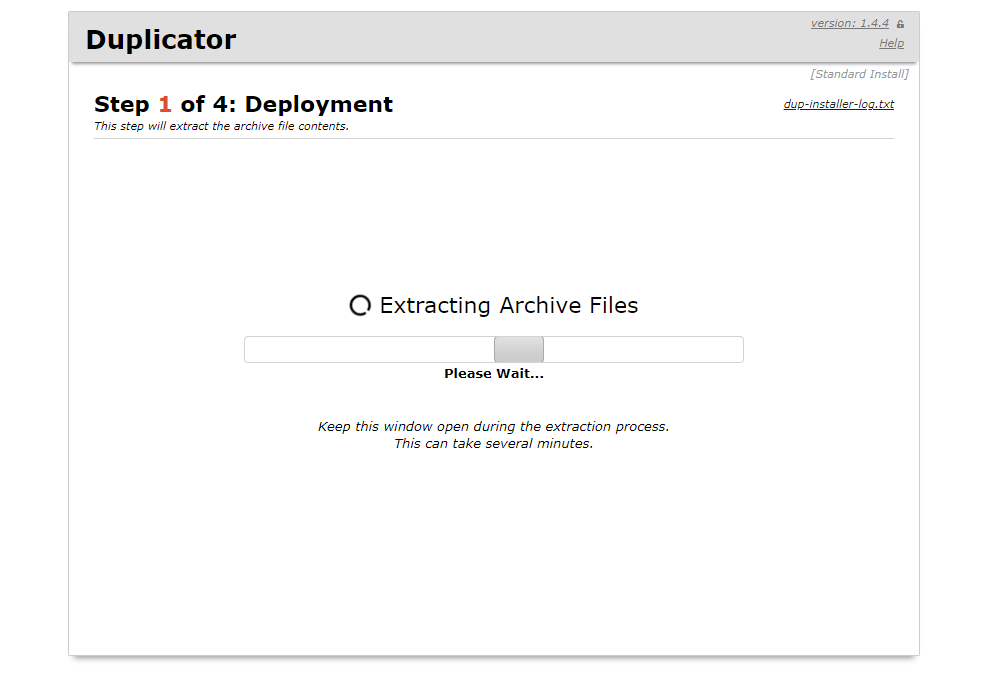
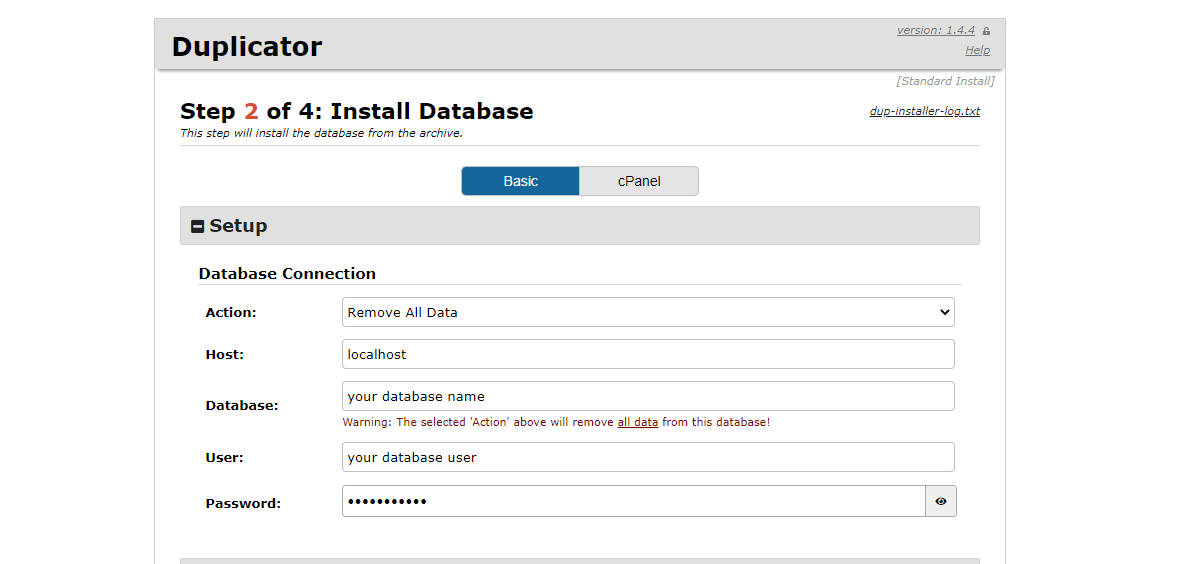
The complete process consists of 4 steps:
– Extracting archive files – this step extracts all WP files from the .zip file
– Install Database – in this step you must enter all the information about the database you created, which are the database name, database user and password.
The third step is to validate the data for the database after which it will forward you to the fourth, final step – visit your site and make sure it works.
Visit yourdomainname.com and make sure everything is working properly.
Although you thought move WordPress site from localhost to live server was a complicated task this article showed that it can be done very easily. As you can see, migrating with plugins is much easier. We recommend manual migration only to experienced WordPress users because many unexpected things can happen. Before any action we advise that you always have a backup of all WordPress files.
You may also like:
- How To Migrate WordPress website To A New Server Or Host?
- Best WordPress Security Plugins (2022)
- How to scan and fix your WordPress website for broken links
- Best WordPress Caching Plugins
- How To Add AdSense Code To WordPress Website